
Review (sharing files and collaboration)
 Content of the lesson:
- www.acrobat.com
- Possibilities of Collaboration
Possibilities of Collaboration
Adobe Acrobat allows its users to collaborate on different projects. Users can share documents, work together, share their desktop and more.

- Upload Documents to Acrobat.com... – uploading documents to the server www.acrobat.com
- Share Documents on Acrobat.com... – sharing documents on the server www.acrobat.com
- Create Buzzword Document – creating an on-line document on the server www.acrobat.com, possibility to collaborate with other people, export
- Send & Collaborate Live... – live collaboration using a sent document
- Share My Screen – sharing your desktop
- Go to Acrobat.com – link to the website www.acrobat.com
Acrobat.com – Indroducing Workspace
We will talk about the possibility to store documents on-line at server acrobat.com.
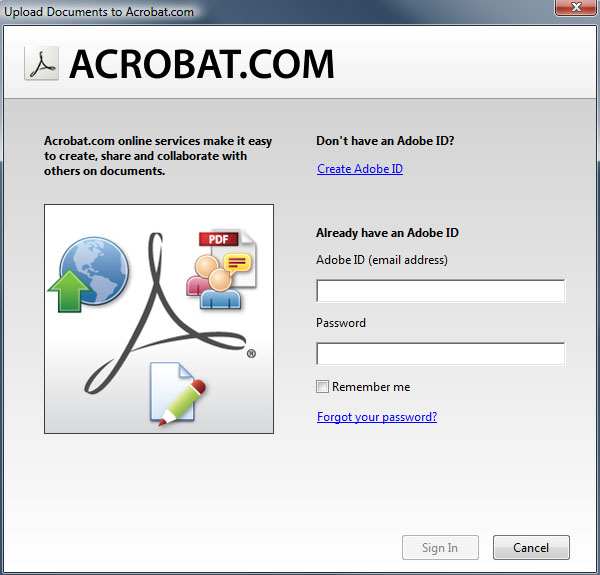
www.acrobat.com - signing in
To be able to use functions connected to sharing and collaboration you have to sign in at server acrobat.com which means entering your e-mail address as the identifier and your password. In case you access the server at the first time and do not own an account, you can click on "Create Adobe ID", see the following image.
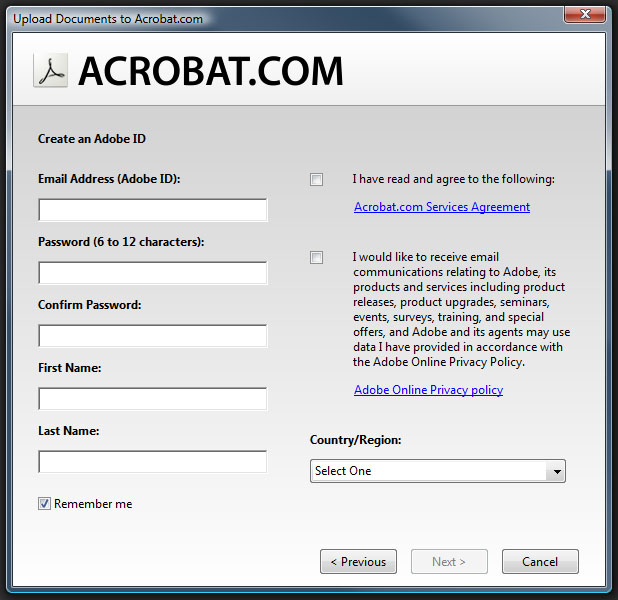
www.acrobat.com - creating an account
Using this dialogue window you can register - you should fill requested details, you can check any of the options and fill your country.
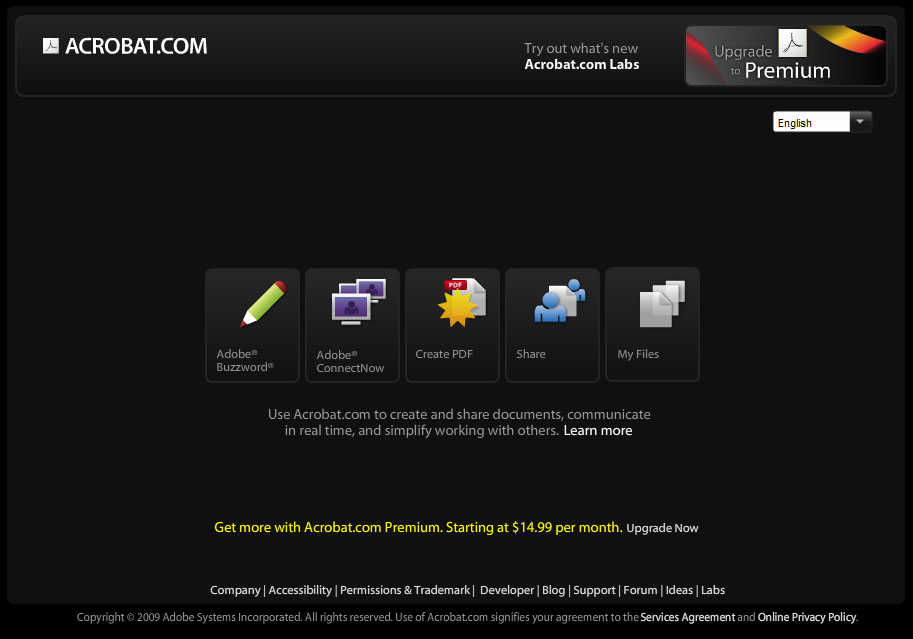
www.acrobat.com - web interface
Login of registration can be done also using a web interface. After entering the address acrobat.com you can see several large icons. You can share, store, create or convert PDF files and you can also share your desktop. You can read about all these possibilities in the following parts.
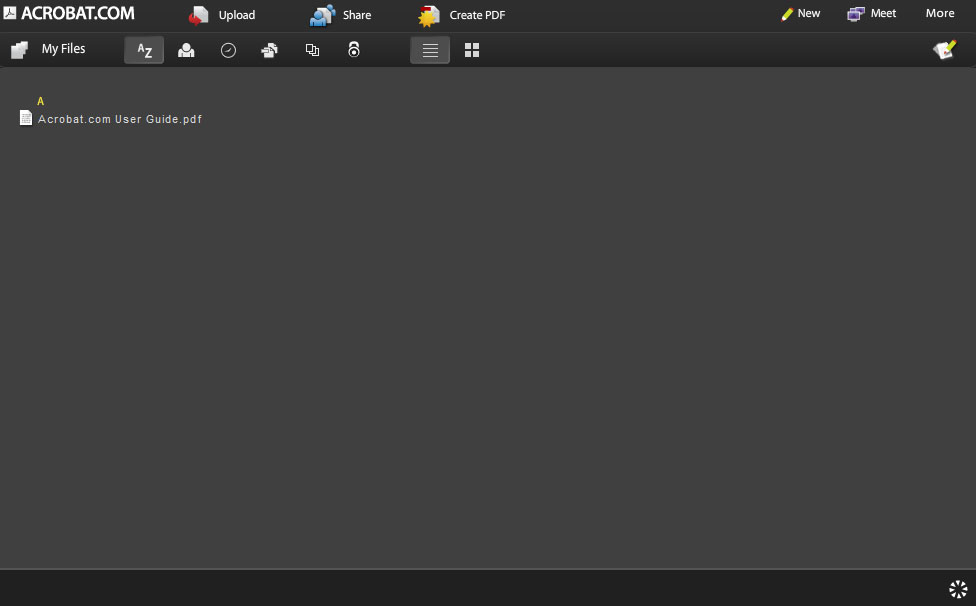
Interface of acrobat.com after login.
Upload Documents to Acrobat.com
Task
Upload the following document to acrobat.com:
Document for practicing: document
Procedure
Prepare the document, click on the button "Collaborate" and choose the option "Upload Documents to Acrobat.com" from the list. In case you are not signed in, you have to do it. Then you will see a dialogue window which will show the path to the file on your hard drive. You can add another document to be uploaded or remove any document from the list. After clicking on the button "Upload" all files will be uploaded to server.
If you want to view any file, you can do it via the web interface from any computer which has an access to the Internet. After uploading your file to Acrobat server you will see a link to your file so you can immediately check it.
Share Documents on Acrobat.com
Task
Upload the following document to acrobat.com and share it with another classmate:
Document for practicing: document
Procedure
You can use the same procedure as in the previous task but you have to allow other users to access your file after uploading it to server. You let the server send them e-mail with link to this file so they can download it.
You should use the button "Share Documents on Acrobat.com" from the list inside "Collaborate" command. You will see a similar dialogue window as in the previous task but descriptions are changed to share and the button "Upload" is replaced with "Next". After clicking on this button you will be able to enter e-mails of people who should get links to your file.
The option "Access Level" is very important. You can set whether the document is accessible to other people than the specified ones or you can limit access for the specified people only. This can be changed later via the web interface.
Create Buzzword Document
This way of creating a document is linked to the web interface. It is a text processor which can be used to create the requested document. You can use several fonts, sizes, highlight options as well as paragraphs, ordered lists, tables or insert images. After creating such a document you can share it with others. This document can be exported to many formats.
Task
Create a document according to the assignment and share it with a classmate.
Final document: document
Procedure
Use available functions in the on-line text processor on server to get the result.
Share My Screen
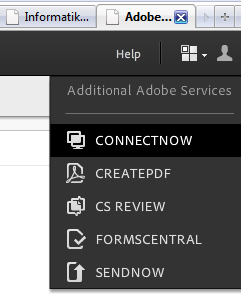
You can share a desktop. You can use the acrobat.com server and click on the icon in the top right corner (squares with a small arrow). Then you have to select the command "Connect now".
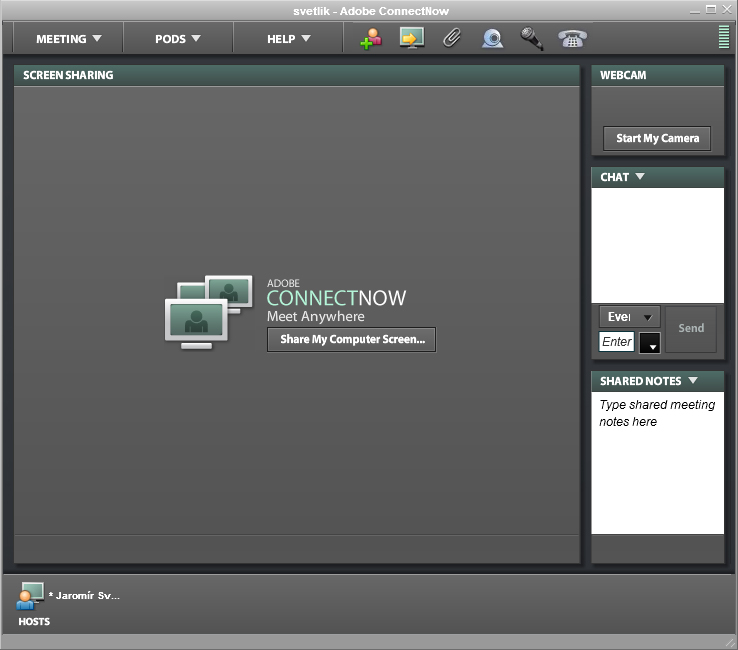
The following window will open and will be used for the transmission. You can start sharing after clicking on the button "Share My Computer Screen" in the middle.
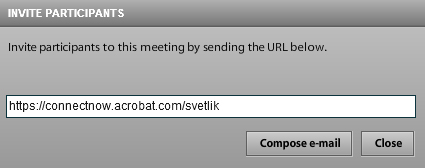
A new dialogue window with an address will appear. You can send this address via e-mail to your friends, colleagues or family for example. These people can watch your desktop from their computer at this address. When combined with a phone call you are able to show any procedure using this method.
Introduction to Notes and Comments
Imagine a real situation - entrance exams are finished and you need to send a letter to all participants with information about their results. The person who has to prepare these letters will take a template and prepare it to be used in the current year. There might be several changes from the previous year which have to be edited. It is necessary to give the letter to boss to be checked and this person needs to create marks, notes or comments inside it.
This can be done by Adobe Acrobat and we will try this procedure. We will take the template and convert it to a PDF file instead of printing it. Then we will send this file to be corrected. To be able to do it one electronic license of Adobe Acrobat is needed - for the person who is responsible for the template of entrance exams letters. This person has to enable comments for the converted PDF file also for Adobe Reader which is free of charge and is installed on almost every computer.
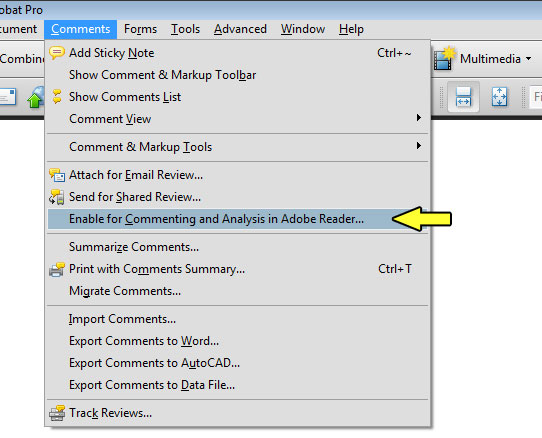
Enabling comments and notes for Adobe Reader
After this operation anybody can open this file inside Adobe Acrobat or Adobe Reader and use the command "Review & Comment". This command is similar in both programs and offers the ability to add comments and notes.

Popup command "Review & Comment" inside Adobe Reader
Take a look at this popup command inside Adobe Acrobat. Single items will be explained later but we will focus on the item "Show Comment & Markup Toolbar" now. When clicked, a new panel will appear - this panel is shown in the image below.
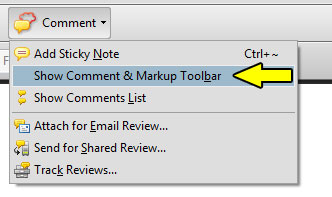
Popup command "Comment" in Adobe Acrobat
- Add Sticky Note - adds a note card
- Show Comments List - shows the list of comments and notes in the bottom part of the program
- Attach for Email Review - tool for e-mail reviews
- Send for Shared Review - tool for sharing a redacted document
- Track Reviews - tool for tracking a shared redacted document
This panel can be used for creating comments and notes inside document. There are many tools for this purpose. We will show their usage.

Panel "Comment & Markup" inside Adobe Acrobat
Notes and Comments Practically
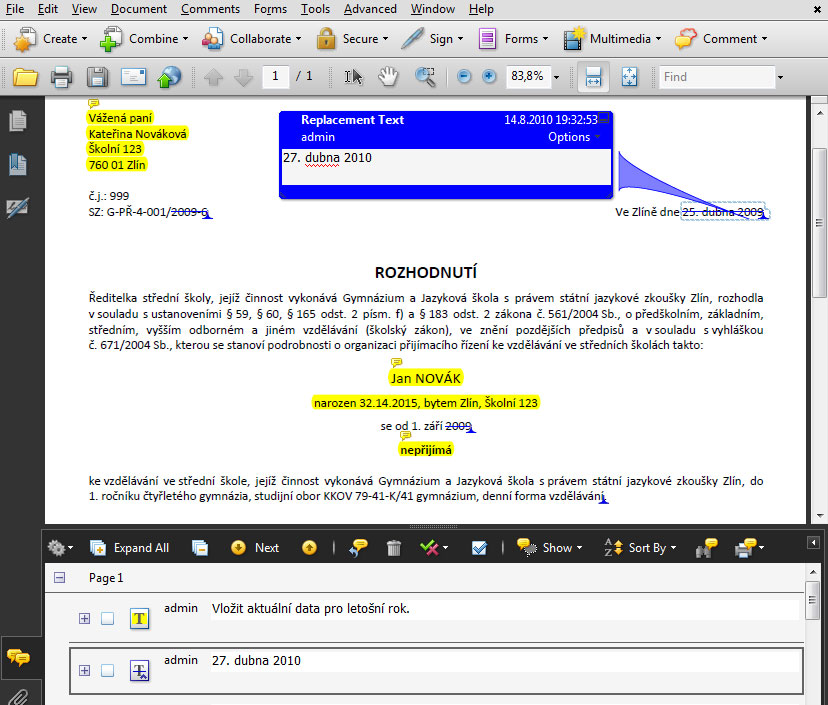
The usage of notes and comments is shown in the next sample. Single tools are demonstrated in short previews. The mentioned document from entrance exams is used for adding comments and notes in Adobe Acrobat, or Adobe Reader (in case comments are enabled by Adobe Acrobat for Adobe Reader users). You can see highlighted yellow text and a yellow note linked to it which asks whether the current data for this year was inserted. Then you can see a striked text and another note linked to it which shows the right text to be inserted instead (for example changing an old date to current date). You can see all notes in the bottom part of the workspace where a manager of notes and comments is located to be able to browse all comments and notes inside the whole document.
Panel "Comment & Markup" inside Adobe Acrobat
Stick Note

This button is used for adding a bubble with a note.

Example of Stick Note
Text Edits
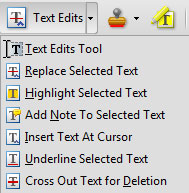
An example of possibilities of the popup button Text Edits.
- Text Edits Tool - This tool combines more tools which are shown here. You can click on the text to select all of it and start writing (Replace Selected Text) or you can place cursor inside the text and start writing (Insert Text At Cursor) or you can select text and press Del key (Cross Out Text for Deletion). All these tools are explained below.
- Replace Selected Text - This tool can replace the selected text. The previous text is stroked and the new text with a comment is inserted inside the bubble panel.
- Highlight Selected Text - This tool can highlight a text. In the following image you can see the highlighted code of subject because more subjects are used so the person who prepares these letters should not forget to edit this detail. This tool is usually used in combination with other tools for notes and comments as shown below (bubbles, arrays, shapes).
- Add Note To Selected Text - This tool can highlight text
and also add a bubble to it where you can write your note.
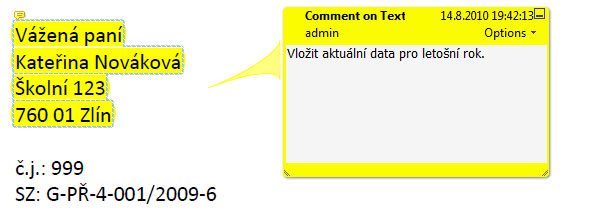
Example of Add Note To Selected Text - Insert Text At Cursor - This tool informs you where a new text should be written. The new text can be placed into the bubble which is created next to this place.
- Underline Selected Text - The selected text is stroked to be highlighted. For example if you want to highlight information about the number of accepted students.
- Cross Out Text for Deletion - Tool which can be used to
mark text which should be deleted.

Example of Cross Out Text for Deletion
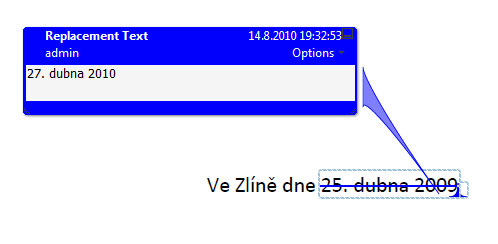
Example of Replace Selected Text

Example of Highlight Selected Text
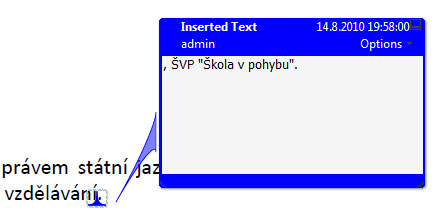
Example of Insert Text At Cursor

Example of Underline Selected Text
Stamp

Using this tool you can quickly and simply add stamps inside your document.
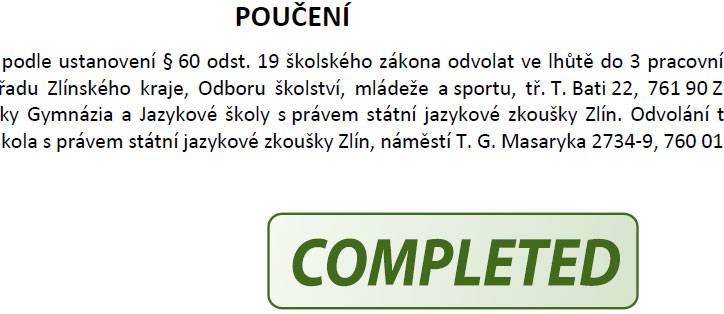
Example of Stamp tool.
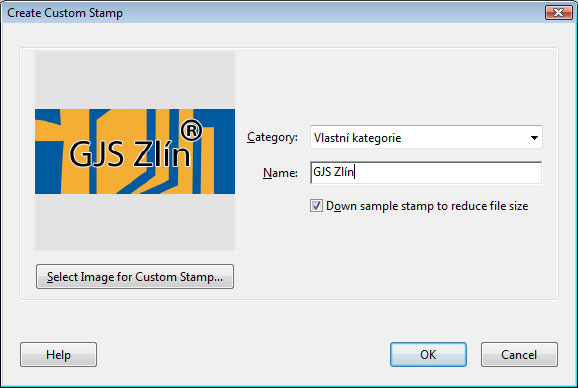
The possibility to create your own stamp
Highlight

This is the same tool which was explained as the "Highlight Selected Text" in the previous part of this lesson.
Example of Higlight Selected Text
Bubbles, Arrays, Shapes

Using these tools you can insert text arrays, arrows, rectangles, ellipses and other shapes inside text. You can see a combination of tools in the following image. At first the text was highlighted by the "Highlight" tool and then a rectangle with an array were added. Finally a comment was added inside the rectangle.

Example of bubbles, arrays and shapes
Pencil Tool

This tool allows you to draw inside documents, to mark text or to tick options. It is similar to writing notes on a paper using a marker.

Example of Pencil Tool
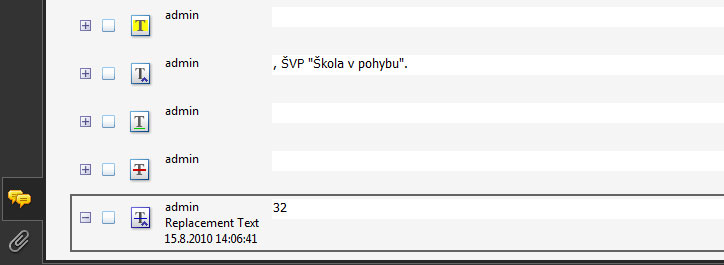
Comments list
This panel can be displayed by clicking on its icon with the image of bubbles as you can see in the following image. It can also be activated using the button "Comment" where you can click on the item "Show Comments List".
You can see the list of all notes and comments inside this panel. There are five examples in the following image - at first a highlighted text, then an inserted text, an underlined text, a text to be deleted and finally a text which will be replaced.
Comments list
The following strip is a part of the Comments panel and you can use it to work with this panel. You can pack or unpack all notes and comments easily, browse all comments and notes, sort, filter, search, print them and more. It is something like an organizer of notes and comments.

Icons for Comments list
This panel can be used for example when the boss communicates with the IT department. You can see that a text should be inserted at the highlighted position. The exact text is written into the bubble and the bubble is displayed after selecting this item. You can see that this item is ticked - these ticks are used by the person who opened this document to better orientate inside notes. He can tick already completed tasks. The green tick in the bottom represents another possibility. This tick is used for the IT department and means that this change was accepted and done. Then you can see that the boss wants to remove a particular text and the IT department answered that they will remove it.
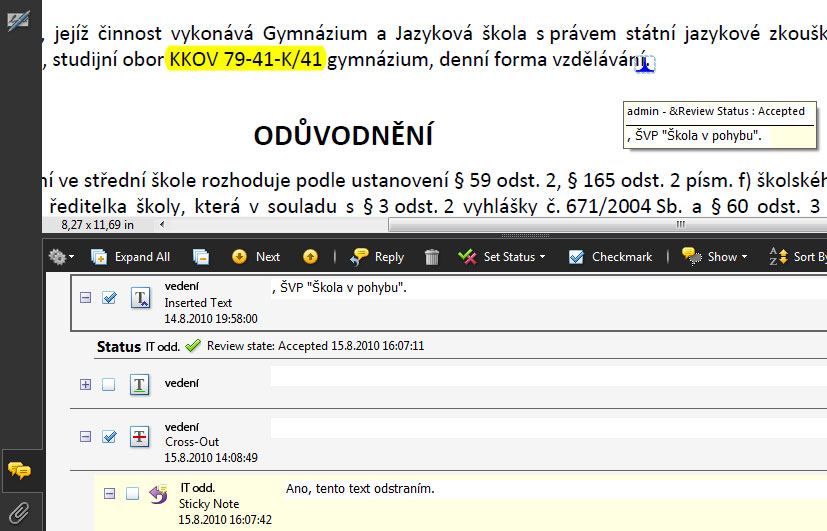
Working with Comments list
Individual Tasks for Notes and Comments
Try to highlight changes which are significant in the newer document using notes and comments inside the older document.
Notes and Comments On-line
You can send an e-mail or share comments using a server. Then you can work on-line and see who added which comment, you can answer immediately, write a new note or react using any other way.
Questions
- How can you share your files with other users?
- Is it possible to create a video conference which will use a shared desktop?
- Which tools do you know for adding notes and comments?
- Is it possible for two people to interact mutually when creating notes and comments?
- Is it possible to insert other shapes inside a document? How?