
Masking Effects, Masking Practices
 Content of the lesson:
- Masking Demonstration
- Masking Explanation
- Masking Individual Task
Masking Demonstration
Masking Explanation
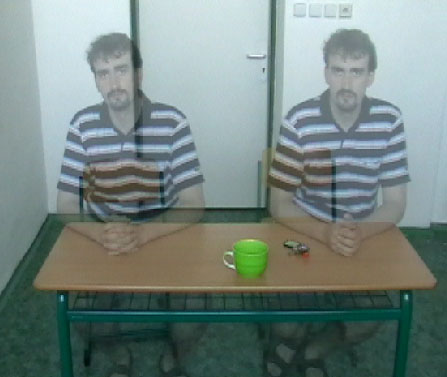
The masking principle was explained in the previous demonstration. In this case one clip was created from two shots from the exactly same place with the same angle of camera. At first we shot e.g. the person sitting on the left chair, then on the right one (we do not have to switch of the camera, it was filming all the time) and then we compound both shots.
The merging is done by putting our clip onto a timeline and by putting the same clip just under the first one in a new layer. Now we have two layers with the same clip in both of them. So, when we switch off the visibility of the first layer we do not see of any change. We set the transparency of the clip in the first layer to 50% so that we can see both clips at the same time and move the clip under the first layer to the right or to the left to get a different time slot.

In the first transparent layer then there is a shot of a person sitting in our right and in the other layer the same person is coming and sits down to the right after a while. Now, we have to synchronize both layers so that they look like in the final clip.
In the first transparent layer then there is a shot of a person sitting in our right and in the other layer the same person is coming and sits down to the right after a while. Now, we have to synchronize both layers so that they look like in the final clip.
And now will describe the transition of the first shot into the other. It is clear that the visibility of both layers must be 100%. But how to make one part of the shot from a clip in the first layer visible and the second one from the clip in the second layer as well at the same time when the second one is covered by the first one? To do this we use masking effects program. Masking helps us to make a chosen part from a clip in the first layer visible and the rest is a shot from a clip in the second layer or vice versa in some part we will see a chosen shot in the second layer and the rest will be a shot from the clip in the first layer.
![]()
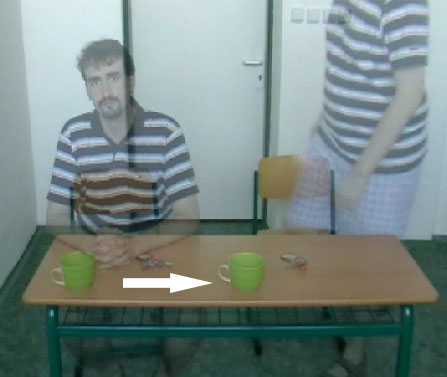
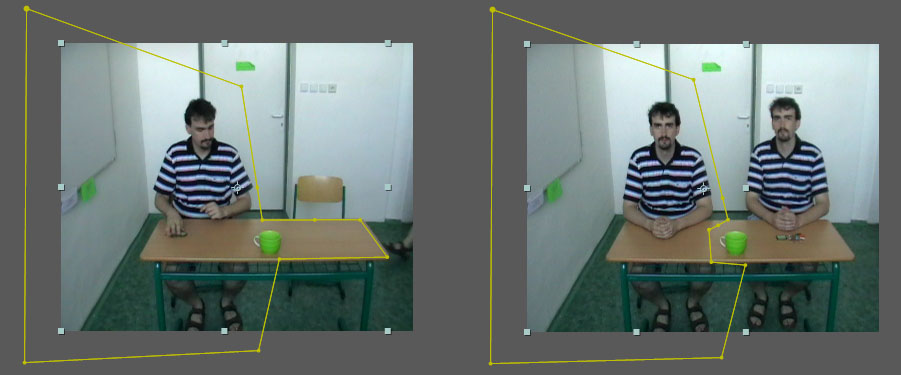
Now we have prepared one shot from the clip in the first layer and the other one from the clip that has been moved in time in the second layer. Choose Pen Tool and using it click in the first layer to define the person so that you pick the person as well as the place where the cup will be placed and also the whole table because the keys will be throne and will move across the whole table. If we do not do this and choose a mask only in the place of the person, we see two cups and two bunches of keys at the same time. Namely, there is the first cup on our left together with the keys in the shot from the clip in the first layer and in the second shot in the second layer it is in the middle with the keys on the right. The objects in the second layer are waiting to be placed there by the person from the shot of the clip in the first layer in a while. Then the second part of the shot of the clip in the second layer can run. There the person sitting on the right can take the objects. And there is one more thing to add. If you cannot see the line defining the mask, you have to press Toggle View Mask button.
But how to replace the shots in certain areas unnoticed? This is more difficult and mainly because you need to dupe the watcher`s perception cleverly so that they do not notice the changes of the hues we talked about in the previous paragraphs. Masking has got a lot of options and settings. It can change in time among others. We can even move the mask or misshape it during the passage of the clip. And we do all this by key shots. We can say that we animate the mask to dupe the watcher when we do not want them to notice the change of shadows or hues. We use the arrival of the second person at the time when it is sitting down at the table and move the mask so that it looks like the change of the hues is connected with shadowing the table by the coming person. When the person is sitting down, it bends above the table and creates a shadow. This shadow moves unobtrusively up to the centre of the table and slowly goes over the cup standing there.
Let`s have a look at the mask options:
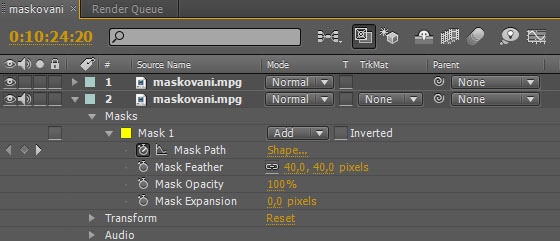
- Mask Mode - mask behaviour.
- Mask Shape - is used to set the size, shape and placement of the mask; it also enables to record time changes when you click the stopwatch. It is very important for our work
- Mask Feather - another important item that softens margins of the mask, it even dissolves them to merge with the surroundings. This option together with the previous one enables us to dupe the watcher`s perception so that they do not notice the change between the two clips
- Mask Opacity - setting of the transparency of the mask
- Mask Expansion - the change of the size of the mask. We can make the mask smaller or wider than we set it
The last thing to do is to set Mask Feather to approximately 40px and move the scroll bar on the timeline into the place when the second person is coming. Switch on the stopwatch at the Mask Shape, insert the key frame, move the scroll bar into the place when the second person is sitting and take the cup and adjust the mask so that the first person is chosen but the mask does not interfere the movement of the second person. Of course, it is necessary to play the whole thing, check the movement of the mask and adjust it if necessary.
And this is the end of creating the effect.
Masking Individual Task
Task
Create an effect of the double-role shown in the previous demonstration according the above introduced procedure.
Video to practise: dvojrole
Questions
- How can masking be used?
- How is masking done?
- What is a mask and how is it applied?