
HR Manager
 Content
of the lesson:
Content
of the lesson:
- Introduction
- Step 1 – The Base of the Page
- Step 2 – The Main Schema of the Page
- Step 3 – The Horizontal Top Menu
- Step 4 – The Vertical Left Menu
- Step 5 – The Footer
- Step 6 – The Content (part I)
- Step 7 – The Content (part II)
Introduction
We are going to create a website in this lesson for a company named HR manager which deals with job matters. We are going to create a static page, use HTML and CSS Styles and try to create a friendly and simple design for this company presentation.
At first we open Adobe Dreamweaver and choose new HTML document from menu. We save it immediately and unpack this archive with images into the same directory.
The structure should be the same as illustrated here:
- images [image1.jpg, image2.jpg, ...]
- css [styly.css]
- index.html
Step 1 – The Base of the Page
The first thing we do is changing the page title. We can use HR Manager as a title. We add a CSS file into the header to have all css rules in an external CSS file. Using external CSS files is a good idea because it is very simple to edit styles for many documents at once and you can also change the design only by copying one file (for example winter design, sales, ...).
We can see the attribute media in the link to the CSS file. The value screen tells browser to use this set of rules only for a standard browser (not for printing, mobile devices etc.). Then we can see the meta tag in the second line which tells the browser that the document is saved in UTF-8 encoding. UTF-8 encoding is able to handle special characters with diacritical marks, so we will use exclusively this encoding while creating any websites.
<head>
<meta http-equiv="Content-Type" content="text/html; charset=utf-8" />
<title>HR Manager</title>

<link href="css/styly.css" rel="stylesheet" type="text/css" media="screen" />
</head>
Before we start writing anything to our .css file, we make sure that these lines are added to the beginning:
* {
  padding: 0px;
  margin: 0px;
}
This command guarantees that no browser will display wrong indentation somewhere in our document. This is a very common problem because browsers often use their default values of padding and margin. This mistake is very difficult to find so we prevent ourselves from making it.
The next step is adding a background image for the whole page (we are going to add styles to tag body, which represents the whole page). We are going to add a background color, a background image, set the image position (horizontally to the center and vertically at the top) and set that we do not want it to be repeated. We are also going to set the font for the whole page.
body {
 background-color: #bcd748;
 background-image: url(../images/bodybackground.jpg);
 background-repeat: no-repeat;
 background-position: center top;
 font-family: Tahoma, Geneva, sans-serif;
}
Our page should look like the following image after this step.

Step 2 – The Main Schema of the Page
We create the main div with id box in our body element. This will be the container for the whole centered content where the entire following code will be placed.
We are going to continue with creating individual div elements which will set the shape of the centered box. We create 4 div elements below each other and set ids (in this order) to header, menu, content a footer. The names already show their roles. We can also use a method of adding a 1 pixel wide border with different colors to each div to see their position and size in our page or to debug our page if any problem occurs.
<div id="header">
</div>

<div id="menu">

</div>

<div id="content">
</div>

<div id="footer">
</div>
There will be a horizontal menu and a top strip in the box header. There will be a classical left menu in the box menu, text content inside the box content and a copyright in the box footer.
We also insert an image inside the header div and do not forget to add the compulsory alt attribute; otherwise our site will not be classified as valid with the w3 validator.

<img src="images/topstrip.jpg" alt="Horní proužek" />
We are now going to style these elements, at first the box div where we need to set fixed width to be able to center it with margin: auto command (this command automatically computes right and left indentation to center the element precisely in the parent element - in this case the parent element is body).
div#box {
 width: 805px;
 margin: auto;
 margin-top: 200px;
 background-color: #95af41;
}
The div header needs to have fixed height because of the height of the inner image and the height of the menu which we are going to add in the Step 3.
div#header {
 height: 39px;
}
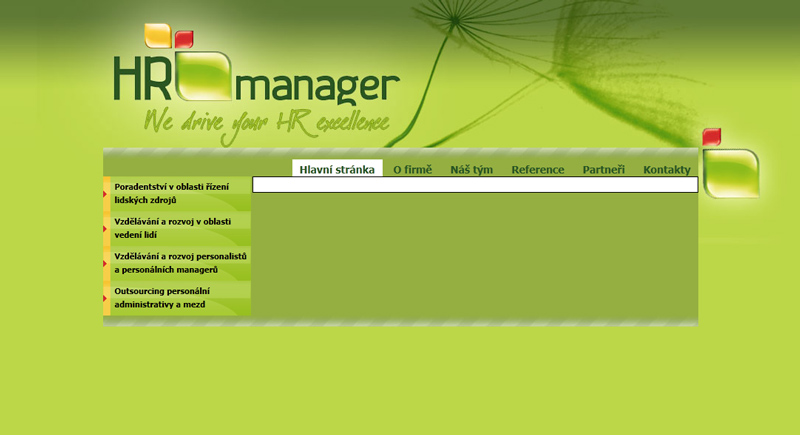
The next step is to add another div with id menu which we place under the header. We can see using the float: left command. This command takes the element and tries to push it to the left and to the top at once (inside the parent element). We can use the command float: right as well and this command has the same function, bud pushes the element to the right.
div#menu {
 float: left;
 width: 200px;
}
div#content {
 background-color: #FFF;
 border: solid 1px black;
 float: right;
 width: 581px;
 padding: 10px;
}
(There is also a 1 pixel wide border around the content.)
We use the float command here because we need to place two divs horizontally next to each other and we do not know their heights so we cannot use commands like margin-top or something similar (we do not consider absolute positioning or tables because their usage is considered as obsolete). Without using the float command the menu would be placed above the content div.
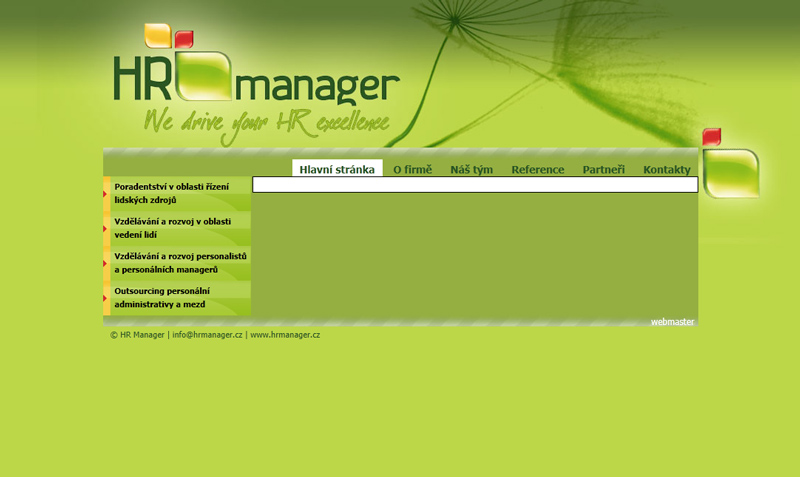
However, the float command requires to be terminated, otherwise every following elements would be effected. The next problem is visible in the previous image - the menu div is not as high as the content div because of not terminating the float command. After adding the termination, the menu div will be stretched to have the same height as the content div (we can see the result in the following image).
You may have considered why the content div has a individual height but the menu div has zero height. The explanation is in the CSS rule which we set - padding: 10px. This rule defines that the whole content of the content div will have a 10px indentation so even the empty content will have this indentation and the height will be 10 + 10 pixels.
The terminating command is clear: both which has to be placed in CSS style of the first following element after the content - the footer div. The footer div should also have the height set according to the height of the bottom strip.
div#footer {
 clear: both;
 height: 16px;
 background-image: url(../images/botstrip.jpg);
}
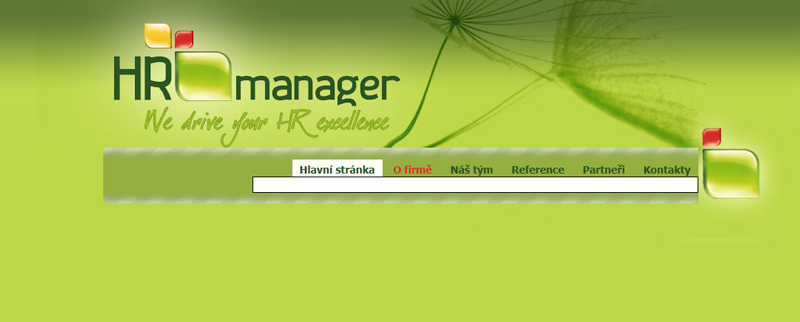
Step 3 – The Horizontal Top Menu
The horizontal menu should be placed inside the header div as a bulleted list where we set to hide the bullets before the items using the command list-style-type: none. The standard list is not horizontal but it is vertical so we have to solve this problem by using the command display: inline.
The code for the list is not difficult, we have to nest links inside the list items.
<ul id="menutop">
 <li class="menutop_active"><a href="hlavnistranka.html">Hlavní stránka</a></li>
 <li><a href="ofirme.html">O firmě</a></li>

 <li><a href="nastym.html">Náš tým</a></li>
 <li><a href="reference.html">Reference</a></li>
 <li><a href="partneri.html">Partneři</a></li>

 <li><a href="kontakty.html">Kontakty</a></li>
</ul>
You could see that the first item has its own class - this is because its background will be colored to white to stress the active page. There is also a rule for the items to change font color to red after moving the mouse cursor over it.
.menutop_active {
 background-color: white;
}
We can set several details for the items as padding, text align, font size, color and other styles which are visible in the following part of the code. We can also see the command for horizontal list in the second row.
div#header ul li{
 display: inline;
 font-size: 18px;
 height: 24px;
 list-style-type: none;
 padding-top: 0px;
 text-align: center;
 padding-top: 1px;
 padding-left: 10px;
 padding-right: 10px;
}
div#header ul li a{
 color: #275622;
 text-decoration: none;
 font-size: 14px;
 font-weight: bold;
}
div#header ul li a:hover{
 color: #d62f29;
 text-decoration: none;
 font-weight: bold;
}
In case we view our page in this moment, we find out that the whole menu is placed on the left - we did not want this. We do not have another possibility than adding the float: right command for the whole bulleted list (we do not have to add the terminating clear: both command because there is no following element in the header div).
div#header ul {
 float: right;
}
Step 4 – The Vertical Left Menu
The left menu will be placed inside the menu div and we are going to create it using the bulleted list again where we set to hide the bullets before text in every item.
<ul id="menuleve">
 <li><a href="poradenstvi.html">Poradentství v oblasti řízení lidských zdrojů</a></li>

 <li><a href="vzdelavanilidi.html">Vzdělávání a rozvoj v oblasti vedení lidí</a></li>
 <li><a href="outsourcing.html">Outsourcing personální administrativy a mezd</a></li>
</ul>
We create a new rule for menu li in our CSS file where we set a suitable font size, hide the bullets, choose the background image and set the height according to the background image. We have to play with the padding values to center the text inside the items.
After moving the mouse cursor inside the rectangle of the list item we want it to be changed to Pointer to signal that it is a link. There are several rules also for the links - we do not want them to be decorated like underlining and we set them to be bold.
div#menu ul li{
 font-size: 18px;
 height: 41px;
 list-style-type: none;
 padding: 0px;
 text-align: left;
 background-image: url(../images/btn-bg.jpg);
 background-repeat: no-repeat;
 line-height: 15px;
 padding-top: 6px;
 padding-left: 16px;
}
div#menu ul li:hover{
 color: white;
 cursor: pointer;
}
div#menu ul li a
{
 color: inherit;
 text-decoration: none;
 font-size: 11px;
 font-weight: bold;
}
Step 5 – The Footer
We usually insert information about copyright, website creator's name, links, time, date and other texts into footer. We can also insert an image from w3 validator after validating our page.
We add two divs (webmaster and copyright) to the footer div - in this order because we want the webmaster div to be placed above the copyright div.
<div id="footer">
 <div id="webmaster" >webmaster</div>
 <div id="copyright" >© HR Manager | info@hrmanager.cz | www.hrmanager.cz</div>

</div>
We are going to use the float command again to push the webmaster div to the right and the copyright div to the left. We also set the padding for these texts to place them as we wish. We do not have to terminate the float commands because these elements are the last ones in the page.
div#copyright {
 float: left;
 padding-top: 18px;
 padding-left: 10px;
 font-size: 11px;
 color: #275622;
 padding-bottom: 20px;
}
div#webmaster {
 float: right;
 font-size: 12px;
 color: white;
 padding-right: 5px;
}
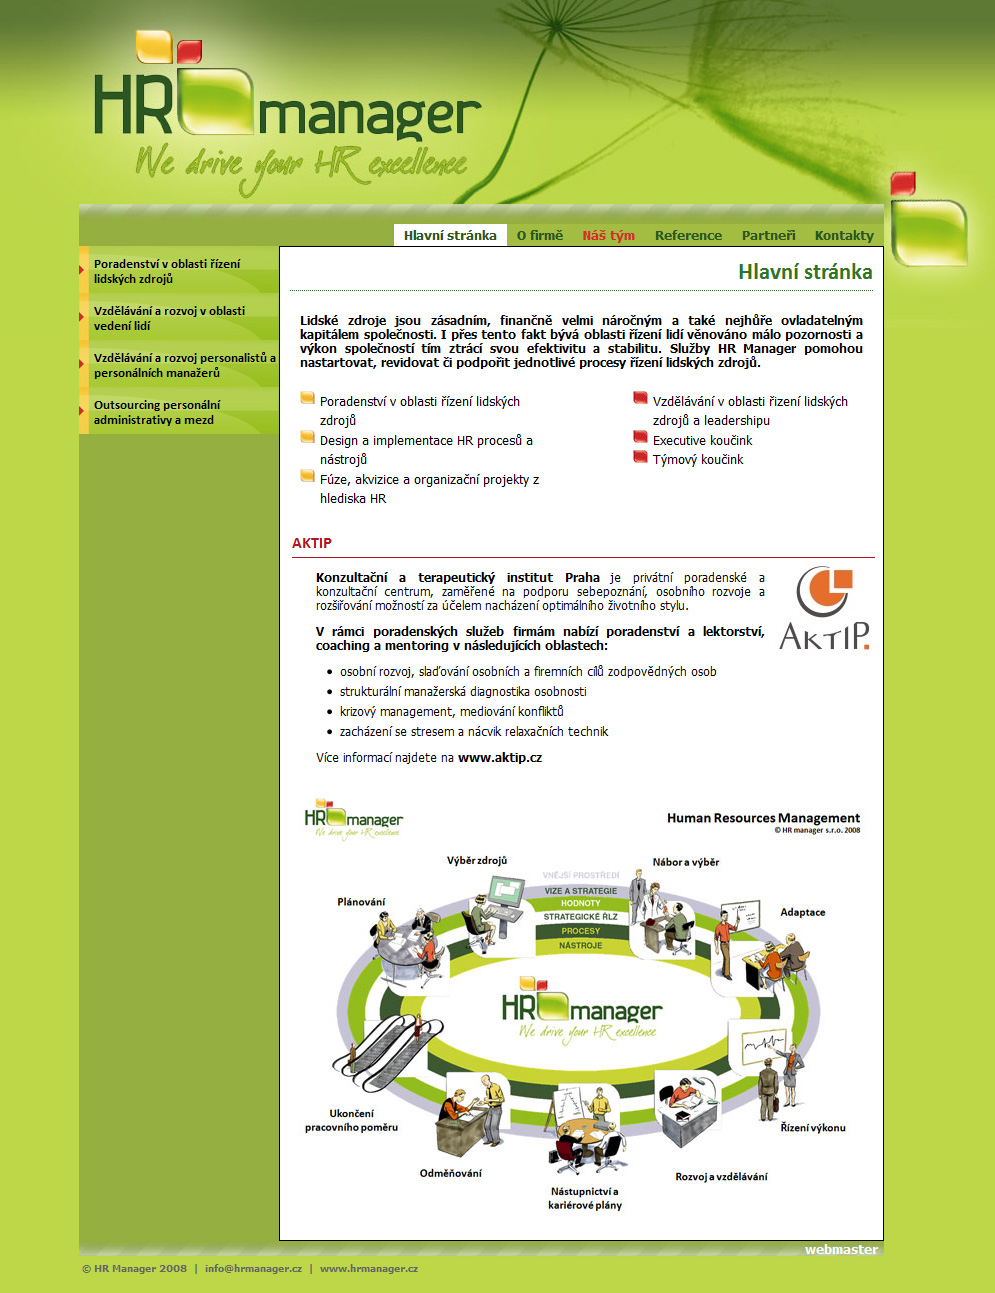
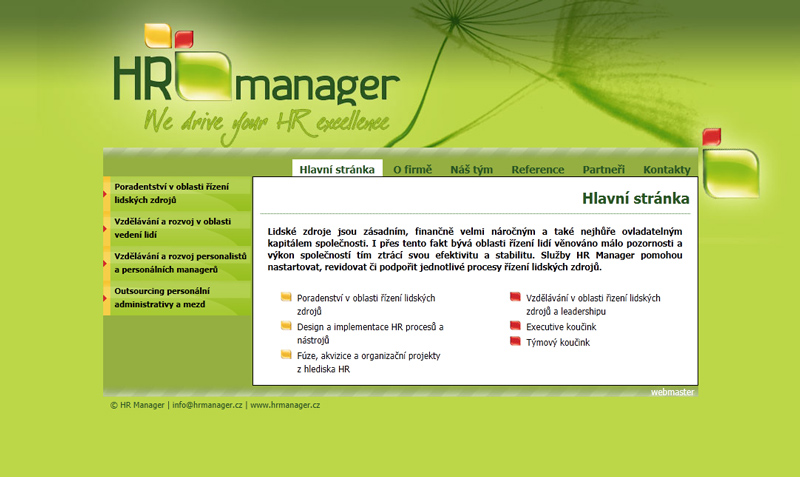
Step 6 – The Content (part I)
We insert a simple h1 headline inside the content div and set its bottom border to be dotted to divide the headline from the rest of the text optically.
Then we add two bulleted lists (each one to its own div to be able to align them using the float: left command – and we align them to left with fixed width, the floating will be terminated in the next step). It is necessary to set padding for the lists to make the text look nice. We use fixed width of 200 pixels so both lists can fit inside the page.
We have to hide the bullets before list items in both lists and we use images from our unpacked folder (there are two types so we have to create two sets of CSS rules). Then we have to adjust the height of the line to correspond with the images and add padding-bottom not to have the items so close to each other.
We can see that the float: left command is used also for the items to align everything inside the list to the left side.
<h1>Hlavní stránka</h1>

<p class="texttoptucny">
Lidské zdroje jsou zásadním, finančně velmi náročným a také nejhůře ovladatelným kapitálem
společnosti. I přes tento fakt bývá oblasti řízení lidí věnováno málo pozornosti a výkon
společností tím ztrácí svou efektivitu a stabilitu. Služby HR Manager pomohou nastartovat,
revidovat či podpořit jednotlivé procesy řízení lidských zdrojů.
</p>


<div id="seznamlevy">
 <ul>
  <li class="seznamitemlevy">Poradenství v oblasti řízení lidských zdrojů </li>
  <li class="seznamitemlevy">Design a implementace HR procesů a nástrojů </li>
  <li class="seznamitemlevy">Fúze, akvizice a organizační projekty z hlediska HR</li>
 </ul>

</div>

<div id="seznampravy">
 <ul>
  <li class="seznamitempravy">Vzdělávání v oblasti řizení lidských zdrojů a leadershipu </li>
  <li class="seznamitempravy">Executive koučink </li>

  <li class="seznamitempravy">Týmový koučink </li>
 </ul>
</div>
CSS:
h1 {
 color: #275622;
 text-align: right;
 border-bottom: dotted 1px #34742a;
 font-size: 20px;
 text-decoration: none;
 padding-bottom: 8px;
 padding-top: 5px;
}
p.texttoptucny {
 text-align: justify;
 font-weight: bold;
 font-size: 12px;
 padding-top: 15px;
 padding-left: 10px;
 padding-right: 10px;
}
div#seznamlevy{
 padding-left: 50px;
 padding-top: 25px;
 float: left;
 width: 200px;
}
div#seznampravy
{
 padding-left: 110px;
 padding-top: 25px;
 float: left;
 width: 200px;
}
.seznamitemlevy {
 font-size: 12px;
 list-style-type: none;
 list-style-image: url(../images/yds.jpg);
 line-height: 18px;
 padding-bottom: 3px;
 float: left;
 width: 200px;
}
.seznamitempravy
{
 font-size: 12px;
 list-style-type: none;
 list-style-image: url(../images/rds.jpg);
 line-height: 18px;
 padding-bottom: 3px;
 float: left;
 width: 200px;
}
Step 7 – The Content (part II)
We only add text, list and two images in the second part. The headline h2 has also a bottom dotted border to be divided from the following text. We can see that the logo image has its margin-top value set to -110 pixels. Together with the margin-left command this ensures that the image will be pushed to the right border of the page and it will push away the text before it. We can get a similar result using fixed width of the div with the text and using the float command.
There is a link at the end of the text where we set target="_blank" which ensures that the link will be opened in new panel or window so the user can go back to our page after closing the linked website.
<h2>AKTIP</h2>
<div id="aktip_text">
 <p>
  <strong>Konzultační a terapeutický institut Praha</strong> je privátní poradenské a konzultační
centrum, zaměřené na podporu sebepoznání, osobního rozvoje a rozšiřování možností za účelem
   nacházení optimálního životního stylu.
 </p>
 <p>
  <strong>V rámci poradenských služeb firmám nabízí poradenství a lektorství, coaching a mentoring
   v následujících oblastech: </strong>
 </p>
<div id="aktip">
 <img src="images/logo_aktip.jpg" alt="Aktip logo" />
</div>
<div id="aktip_seznam">
 <ul>
  <li>osobní rozvoj, slaďování osobních a firemních cílů zodpovědných osob </li>

  <li>vzdělávání v oblasti řizení lidských zdrojů a leadershipu </li>
  <li>krizový management, mediování konfliktů </li>
  <li>zacházení se stresem a nácvik relaxačních technik </li>
 </ul>

</div>
Více informací najdete na <a href="http://www.aktip.cz" target="_blank">www.aktip.cz</a>
</div>
<img src="images/HR-schema-popis.jpg" alt="HR Manager schema" />
CSS:
div#content h2
{
 border-style: none;
 border-bottom: 1px solid #b31521;
 color: #b31521;
 font-size: 14px;
 text-align: left;
 clear: both;
 padding-top: 15px;
 padding-bottom: 6px;
 font-family: Tahoma, Geneva, sans-serif;
}
div#aktip_text
{
 padding-top: 15px;
 padding-left: 30px;
 font-family: Tahoma, Geneva, sans-serif;
 font-size: 13px;
 width: 420px;
 text-align: justify;
 padding-bottom: 20px;
}
div#aktip_text p
{
 margin-bottom: 15px;
}
div#aktip_seznam
{
 padding-top: 25px;
 padding-left: 25px;
 padding-bottom: 10px;
}
div#aktip_seznam ul li
{
 padding-bottom: 3px;
}
div#aktip_text a
{
 text-decoration: none;
 font-weight: bold;
 color: black;
}
div#aktip
{
 margin-top: -110px;
 margin-left: 440px;
}
Additional Texts
Questions and Exercises
- Try to create the whole page without using this document. If you manage to complete it you are able to create almost any static website.