
Static Web Gallery and Lightbox Component
 Content of the lesson:
- What Is Lightbox
- Downloading and Inserting Lightbox
- Editing Images
- Launching Lightbox
- Adjustments and Translation
What Is Lightbox
Lightbox is a javascript application to present images or photos.
After clicking on an image it darkens the background of your browser and opens the photo in a simulated window in full resolution using a simple effect.
It is used especially for web galleries and websites aimed to presenting photos or images.
Advantages
- easy installation
- an option to switch images inside the lightbox panel
- it shows images in full resolution
- an image is highlighted using white border
- you can translate texts to Czech
Disadvantages
- opening images is slow
- problems with flash banners and other flash elements can occur
- not every web browser supports Lightbox
- you can download unwanted files and viruses when downloading Lightbox
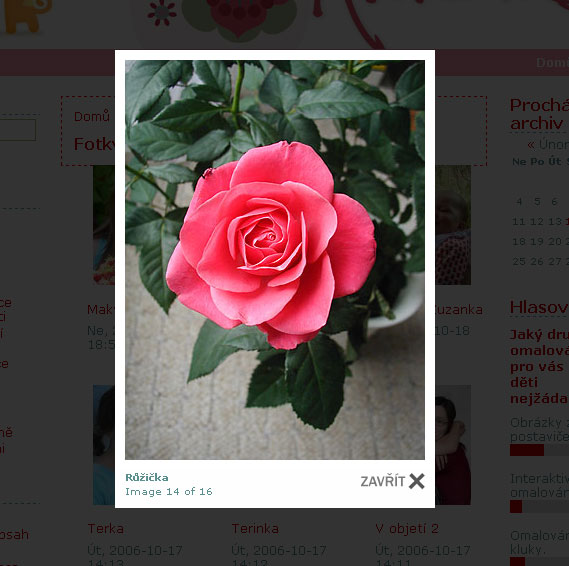
Lightbox Sample
Downloading and Inserting Lightbox
Lightbox 2 is available nowadays.
You can download it free here: http://www.huddletogether.com/projects/lightbox2/. You have to scroll the page down and click on this button:

Save the file on your hard drive, extract it and the copy to the directory with your website.
Editing Images
To be able to place images or photos on your page you have to edit their
resolution (size).
Images which will be placed directly in the page have to be reduced (you want to
fit many of them). These thumbnails will act as links to the original photos
which will open in Lightbox.
You can download sample images using this link: staticka-webova-galerie-soubory.zip
and extract it.
Then you can edit them using Adobe Photoshop where you can select the File >
Scripts > Image Processor tool from the menu.
The following window should appear:
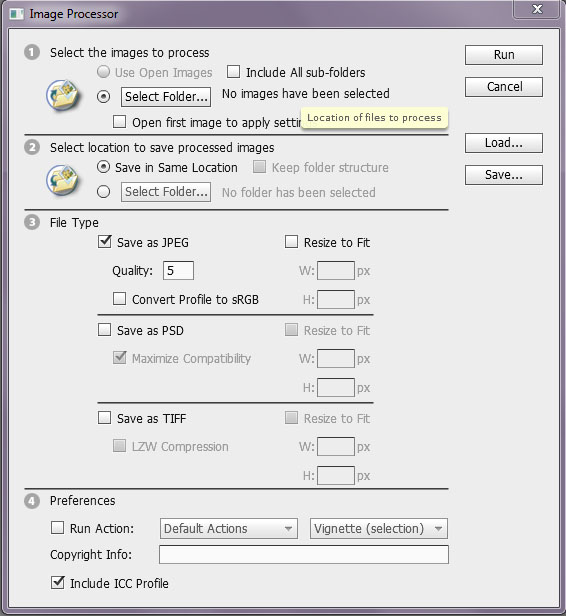
- 1: Select the images to process = select a folder where your source images are located (using the Select folder button).
- 2: Select location to save processed images = select a folder where you want to save the result (using the Select folder button) or you can let Adobe Photoshop save the result in the source directory (it will not overwrite anything, a new subdirectory will be created).
- 3: File type = you can choose the image format and its size
(set Jpeg format and size 200x133 pixels).
!Do not forget the fact that some photos were taken horizontally and some of them vertically.
When you set everything you wanted, click on the Run button and let Photoshop do the whole job automatically. Then copy the output directory to your website.
Launching Lightbox
Settings
All you have to do to launch Lightbox is to add these lines inside your source code:
<script type="text/javascript" src="js/prototype.js"></script>
<script type="text/javascript" src="js/scriptaculous.js?load=effects"></script>
<script type="text/javascript" src="js/lightbox.js"></script><link rel="stylesheet" href="css/lightbox.css" type="text/css" media="screen" />Activation
To activate Lightbox after clicking on an image link you have to add this
attribute to the link: rel="lightbox".
Pay attention to set the links to the images in full resolution and the sources
of the thumbnail images to the reduced images.
<a href="images/image-1.jpg" rel="lightbox" title="my caption">image #1</a>
<a href="images/image-2.jpg" rel="lightbox" title="my caption">image #2</a>
<a href="images/image-3.jpg" rel="lightbox" title="my caption">image #3</a>
Adjustments and Translation
Adjustments
One of the most used adjustments is changing the speed of the intro effect (the effect of revealing the image). You can find the js folder inside the root directory of your website and inside the js folder is a file named lightbox.js - open it.
//
//  Configurationl
//
LightboxOptions = Object.extend({
    fileLoadingImage:        'images/loading.gif',
    fileBottomNavCloseImage: 'images/closelabel.gif',

    overlayOpacity: 0.8,   // controls transparency of shadow overlay

    animate: true,         // toggles resizing animations
    resizeSpeed: 10,        // controls the speed of the image resizing animations (1=slowest and 10=fastest)

    borderSize: 10,         //if you adjust the padding in the CSS, you will need to update this variable

	// When grouping images this is used to write: Image # of #.
	// Change it for non-english localization
	labelImage: "Image",
	labelOf: "from"
}, window.LightboxOptions || {});
You can adjust the value of resizeSpeed between 1 and 10 (1=the slowest animation, 10=the fastest animation). You can also change the size of the border around the lightbox window by changing the borderSize value.
OverlayOpacity allows you to set the amount of darkening of the background when Lightbox window is opened.
Translation
To complete the lightbox gallery you can translate texts to Czech. The first part can be translated after opening the lightbox.js file:
labelImage: "Image",
labelOf: "from"labelImage: "Obrázek",
labelOf: "z"The rest of lightbox (text icons) can be translated using a graphic editor like Adobe Photoshop. The files can be found in the images folder of your website.
Individual Task
Translate the Lightbox component and create a www page with a gallery using at least 10 images. Use sample images from ESF Diskstation in full resolution (at least 2 MPx).
Questions
- What is Lightbox and how can it be used?
- How can you get Lightbox? Where can you find a tutorial for Lightbox?
- Is it possible to translate texts inside Lightbox to Czech?