
Adobe Flash Introduction
 Content
of the lesson:
Content
of the lesson:
- History, development and description
- Adobe Flash Professional
- Layers
- Tools
- Transformation and Alignment
- Additional Functions
History, development and description
Adobe Flash is a vector graphics program, currently owned by Adobe company (the previous owner was Macromedia - Macromedia Flash).
The Flash technology is used for creating interactive animations (mainly for Internet) which means banners, advertisements or dynamic websites but it is also used for creating presentations, animated videos and games (offline and online - the advantage is that such a game is relatively small in size and can be played directly inside the web browser without being installed.
The spread of Flash around the internet was caused by the size of the final files which is very small because they are kept in the vector format. Standard GIF banners were displaced by Flash banners. However, the Flash has also one disadvantage - any computer has to compute the final image from the vector format and this operation requires some performance (the more objects are drawn, the more performance is needed).
(video size: 6,52 MB)
There is also a concurent for Flash made by Microsoft Company and its name is Silverlight. This technology offers more or less the same as Flash (it is prepared to co-operate with .NET platform) but is not so spread and the support in mobile devices is bad.

In summary, Flash offers an ideal option to create simple or complex animations, to make our website more interesting or to add an advertisement which will attract a customer. We should not forget that web search robots (such as Google) do not have access to inner texts inside flash animations so they are not able to index them into databases which means our website will not be listed in the search results.
Adobe Flash Professional
The application AdobeÛ FlashÛ Professional (the latest version is CS5.5) offers a professional publication environment for creating an impressing interactive content.
We open the program and choose from the panel or from the top menu the option of a new file and we click on ActionScript 3.0 type.
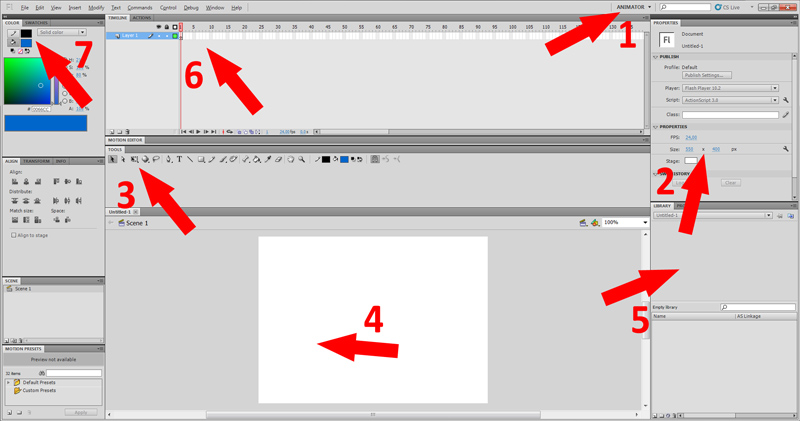
- We can see in the top right corner that it is possible (as in every other Adobe CS5.5 program) to set the mode of panels layout. We will use the mode Animator because it offers all options we need.
- The first things we should set are the dimensions in
pixels and the fps value which sets how many frames will be
drawn every second in the final animation. We set the dimension as
we need but we should consider the FPS value.
Too low value will make the animation not smooth, otherwise too high value will need more performance and the animation will be harder to create for us. Standard value is 12 fps, for smoother animation we can use 24 fps. - The Tool Panel, every tool is explained later in this document.
- The Canvas for drawing, import and more, we will create every frame here.
- We can find the Library with symbols in this section.
- The Timeline and in the second bookmark we see the panel with Actions (actions are to be programmed). There are also the layers in the left side of Timeline panel.
- There is a window with colors in the left column and a window with alignment and transformations under it. We can also find several animation presets in the left bottom corner.
Layers
The Layers in Adobe Flash operate very similar as in Adobe Photoshop, you can add as many layers as you want for better orientation in your project, of course you can lock the layers and the layers are distinguished by colors. For better orientation you can divide layers to directories.
Tools
Ruler, Grid, Snapping
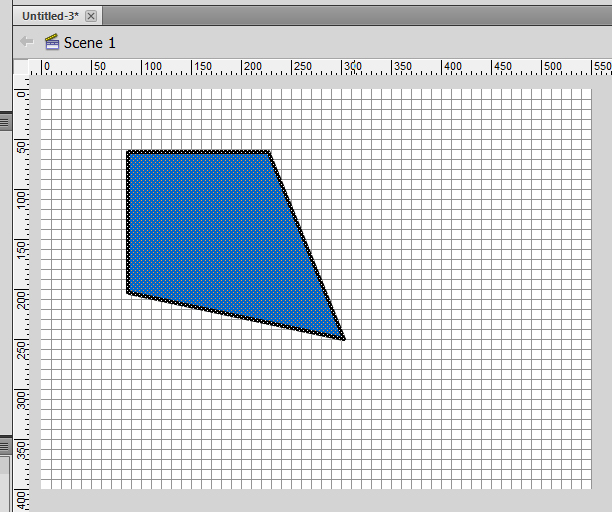
We can use several items from menu View. The ruler can be activated here (we remember the ruler from Adobe Photoshop) and we can set its units (cm, pixels, mm, ...).
Another possibility is to activate the grid which will help us to better orientate ourselves on the canvas. The distance of the lines can be changed.
The last useful thing is snapping which can be used to snap objects to another objects in the scene (it is possible to set the mode in the settings).
Tool panel
In case we have chosen the Animator mode we can find the Tool panel in the middle of our monitor, just above the canvas. The shape tools are very similar as shape tools in Adobe Photoshop or Adobe Illustrator.

-
Selection
 This tool allows us to select any part of the object so we have to pay attention to select both the border and the filling if we want to move the whole object, otherwise we can create changes that will not be reversible after several following steps.
Using this tool we can also create curves from the lines only by dragging the line from its center to any side. After moving the cursor over the line we can see a tiny curve which signals that we can create a curve by dragging the line.
If we want to select the whole border of a complex object, we have to click twice on it.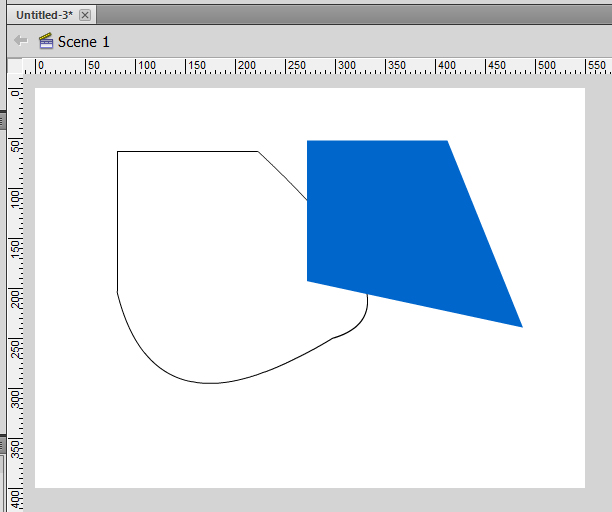
-
Subselection
 This tool is used for selecting the whole object and for changing it as a complex. After clicking on the border you can move any vertex or change curves.
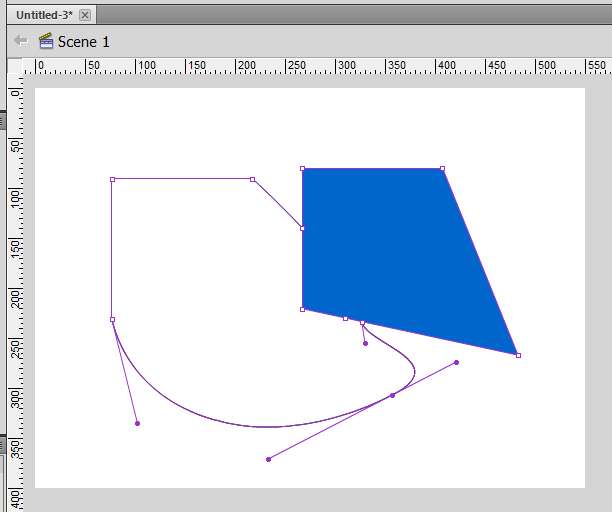
-
Free Transform
 A simple tool for transforming any object, border or filling of any object.
 -
3D objects
 A tool for editing 3D objects in Adobe Flash. Computing and drawing of 3D objects in final animation needs a lot of performance so we should consider using 3D objects.
 -
Lasso
 The Lasso Tool is used to select nonstandard shapes or to select multiple objects. You can also use this tool to select any part of the filling of a object.
 -
Pen
 The Pen allows us to create any curves or to adjust existing curves. We can also add or remove vertexes to objects in the scene and convert vertexes from angular to rounded and vice versa.
If we draw using the Pen, we can set several parameters in the right side of Adobe Flash (Properties panel) as the color of the line, the thickness, the Cap parameter which switch between rounded and angular end and more. -
Text
 A simple tool for adding any text to the canvas, in the Properties panel you can set several details as the font, size, color, upper or lower index and more. The option Anti-alias changes the final appearance of the text so you can try to find the best value for your project.
After expanding the bookmark Paragraph you can set indentation, alignment and more. -
Line
 The Line is a tool to draw straight, arbitrarily long lines, you can set color, thickness and style (solid, dotted, ...) and you can switch between rounded or angular end of the line.
 -
Rectangle
 After holding the button you can see next tools from this set as Ellipse or Polystar. The settings are the same as for the Line and you can set the value of roundness for every vertex when creating a Rectangle. If you want to create an object which has the same width and height, you should hold Shift key. On the top of that, when creating a Rectangle, a tiny circle is drawn in the bottom right corner of the Rectangle if its width is the same as its height.
 -
Pencil
 The Pencil tool can be used to draw any shape, the program will then try to smooth it according to parameter Smoothing and in case it is not possible, the program creates a break. The settings are the same as for the Line.
 -
Brush
 Very similar tool to the Pencil tool, but the curve does not have the same thickness everywhere which simulates painting with a real brush. We can find Spray Brush Tool under this button. Spray Brush Tool sprays selected object around the cursor (you can set any object from the Library, its height, width and rotation).
At the end of the Tool Panel you can see more options. You can set the shape of the brush and also you can switch the mode of the Brush which can lock it to draw only inside the objects or vice versa, to draw inside the selection and more. -
Deco Tool
 This tool allows us to fill any area with predefined symbols or custom symbols. You should only click and you can see the whole process because the symbol will grow automatically. The growth will stop in given direction in case that it reaches any object. You can choose approximately from 15 patterns and you can change their color.
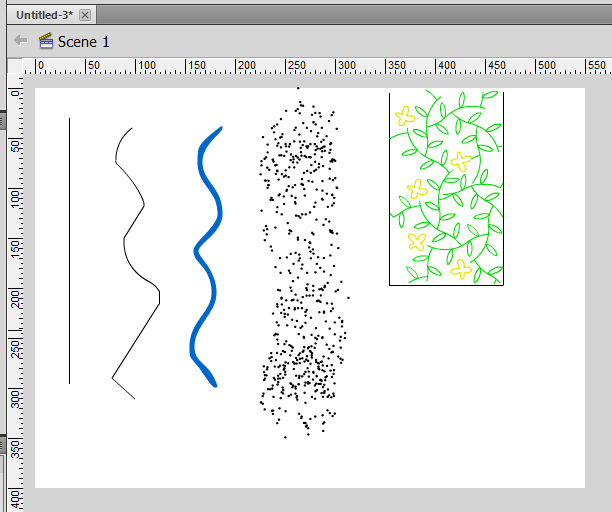 The Line, Pencil, Brush, Spray Brush and Deco Tools (sorted from the left).
 -
Paint Bucket
 This tool is used to fill closed areas as rectangles for example. After activating this tool we can see (at the end of the Tool Panel) an additional option to automatically close the area we want to fill with color.
 -
Eyedropper
 This tool can be used to import a color from any part of the canvas; this color will be set as active.
 -
Rubber
 The Rubber Tool is used to delete any part of any object (you can create any shape using this method). This operation is destructive of course. After deleting parts of any object, the program tries to make the rest rounded.
At the end of the Tool Panel are available more options. The first option sets that the rubber will delete only fillings, only borders or only selected or everything. The last option sets the size and the shape of the rubber. -
Colors
 Using these items we can set colors for border (image of pencil) and for filling (image of bucket).
 -
Hand a Zoom
 The Hand Tool allows us to move the whole canvas, the Zoom Tool allows us to select an area and zoom it to fit the panel with canvas.
 -
Bone Tool
 This is an advanced tool which can create a virtual skeleton for a character or an animal. We can bind parts or subobjects to these bones and create all movements much easier.
Transformation and Alignment
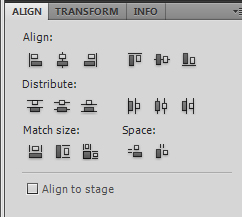
The Align tool allows us to align two objects in several ways. You can align them to the side of one of them or you can align them together. Using this tool you can also set two objects to have the same height or width (using the buttons under Match size headline).
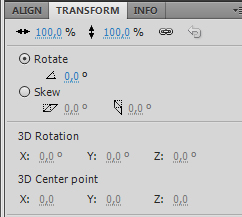
The Transform Tool allows us to change height and width of any object (you can lock the aspect ratio by clicking on the chain), you can also rotate or distort an object. 3D objects can be transformed by using the 3D transform tools.
Additional Functions
Export
You can export all your objects, of course, as single images in any format or as an animation which can be used for web or for presentation (format .swf or videoformats like .avi, .mp4, ...). Program can also export scene to .exe file in case we have created a game or a complicated presentation.
For immediate preview press Ctrl + Enter keys (this is not export).
Timeline
If you think that we were only drawing static objects and these objects did not move at all, you should know that there is a panel called the Timeline. The Timeline is located in the middle (above the Tool Panel) and we can see many rectangles inside this panel. These rectangles represent the key frames of our animation (the same frames we were talking about when explaining FPS). The Timeline will be explained in the next lesson.
ActionScript
ActionScript is a programming language which was developed directly for Flash. It is a full language and you can write complex programs, games or presentation using it. The latest version is 3.0. ActionScript can be used to control any object, action or device (buttons, downloads, keyboard and mouse input, ...) and his basic commands will be shown in the next lessons.
Additional Texts
Questions and Exercises
- Consider using Flash and try to say several situations when it would be useful and several situations when we cannot use Flash (for example, the Apple company has not implemented Flash in iPhone so far).
- Try the described tools because they differ in small details from their copies in other Adobe CS5 programs.