
The Basics of Animation
 Content
of the lesson:
Content
of the lesson:
- Library and Symbols
- Possibilities of Import
- Timeline
- Action and ActionScript
- MotionTween Animation
- ShapeTween Animation
- Button
- Advanced Sample with a Button
- Export of the Scene
Library and Symbols
In the last lesson we have learnt how to create objects directly on the canvas but in case we have to create for example a row of trees and we decide to edit them together, we would have to edit them one by one separately.
Adobe Flash CS5 Professional makes this much easier because of the Library panel. The Library panel is placed in the right bottom corner in the Animator mode, otherwise we can display it from the menu Window. The Library is something like a storage for any objects which can be added to the scene as many times as we need. If we change them inside the library every instance of the object is automatically changed too.
The objects inside the library are called Symbols. A symbol can be created from any number of objects inside the scene, you only have to select them all, click on them using the right mouse button and select the option Convert to Symbol.
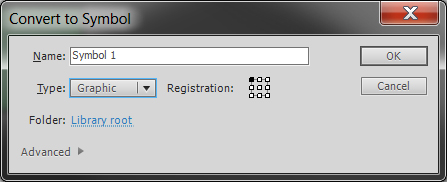
A simple dialog window will open and we can set the type of the symbol and its name.
- Graphic this type is the simplest and we are going to use it frequently. This type is only a static symbol without any functions.
- Button a symbol will be converted to a button with is ready to be programmed and included in the animation.
- Movie Clip similar like the Graphic but it has its own Timeline (timeline is explained later in this lesson) and this Timeline is independent on the main Timeline.
After confirming the dialog we can see a new item in the Library panel and this item can be dragged to canvas. We can also see that the objects were converted to a symbol and we cannot edit them anymore separately. For editing a symbol you have to double click on it and the editable objects open in an isolated view. For going back you have to click the Scene 1 button in the upper part of the panel with canvas.
The symbols can be duplicated, edited, renamed or deleted (by pressing Delete key). You can divide symbols into directories if you want, or create new symbols directly inside the Library. The whole Library is ready to export and can be used in any other project after import (from menu File > Import > Open External Library).
The following video illustrates how to work with symbols.
Possibilities of Import
The drawing tools allow us to create complex objects but often this is not enough. Adobe Flash Professional CS5 can import external objects on the canvas from another Adobe programs as well as from many other programs.
To import an object you should choose File > Import from the menu and set that we want to import the object directly on the canvas or to library. In general, if you are not absolutely sure that you will not use the object more than once and you are not going to create an animation using this object, you should import it to the Library.
You can import all Adobe file types (ai, psd, ), images (jpg, gif, png, bmp, ), video files (mov, mp4, flv, avi, ), exported scenes (swf), 3D objects (dxf) and sounds (mp3, wav).
If we open a supported file (image, video, sound), we can click on Edit option in the top right corner and edit our file in external Adobe software like Photoshop, Illustrator, SoundBooth etc.
Timeline
There is the Timeline in the top part of the window and the Timeline is the key for the animation. Every layer has a row of rectangles next to it and these rectangles are the individual frames (if we set FPS to 12 then 12 frames will be drawn every second).
For better orientation is every fifth frame drawn with a different color. The frames which do not have the border as the first one have not been created yet (we can imagine these places as en empty places where the layer will not be drawn during the animation).
- Keyframes the changes (position, shape, transformation) of every object in the layer are saved in these frames
- Frames these frames only copy properties of objects from the previous frame.
Using frames is easy, we can add Frames by F5 key and Keyframes by F6 key. After clicking on the rectangles with the right mouse button we can see the same commands. We do not have to insert frames gradually, if we insert a new frame more fields to the right then the frames between will be added automatically. The frames without any objects inside are drawn with white background.
If we want to create any change in the animation, we have to set a new Keyframe (F6) in that position. In case we do not want to change anything but only extend the duration of any object in the scene, we create a common Frame (F5).
Working with images is shown in the following video.
- At the beginning we have a blank keyframe. A keyframe can be recognized by a small circle in the bottom of the rectangle. The color of the rectangle is white, because there is no object inside the frame.
- When we add an object inside the frame, the color changes to gray and signals that the frame is not empty anymore.
- We
add
keyframes
by pressing F6.
We can add
keyframes to
the empty
field
as well as to
a field where
no
keyframe has been
created
(there is
only a common frame).
After pressing the F6
key
program stores
all
object's properties
in both the first
and the fifth
frame, and if we change
one of them, the other
one
remains unchanged.
Frames between them
are identified as
common
frames
and
will have the same
content as the
first frame.
This process is repeated several times in the video and the number of squares is increased in each new keyframe.
At the end we see that the newly drawn squares are not in the previous frames. -
Onion Skin
is a very
successful feature that
can help us in
more complex animations.
After pressing the
Onion
Skin
button on the control
panel
we activate
the rendering
of
the edges
of objects from
the
adjacent
frames (if
they differ in
shape or
position).
This means that in the
current frame
we see the edges of
objects from the
adjacent
frames, which
can be used to create smoother and more
precise animations.
The range can be set by dragging the shaded box located on the top of the panel. The feature si turned off the same way as it is turned on. - The animation can be easily played via the control buttons and we can also let it be repeated using the Loop button. You can start the playback by pressing Enter (it will stop automatically in the end).
- Frames
can be
dragged,
but
I do not recommend this
because
especially
the keyframes
sometimes behave
differently than we
would
expect.
However,
we can
see that the program
will automatically
create
frames if we move the
end to another position.
It is not possible to have a
gap somewhere inside the Timeline (the program does not allow it).
If you need to remove the frame, select the option from the context menu. Pressing the Delete key only removes the current frame content. - There is no problem to insert a blank keyframe anywhere.
-
Using
the
keyframes
we
can
create a simple animation
by changing
the object's position in each frame.
If we did not use keyframes but only common frames, then moving
the object would change its position in all frames in the row.
This method of animation, however, is lengthy and the results are not very nice, so we will use other methods (the MotionTween or the ShapeTween animation), which are explained later in the lesson. - The timeline is directly related to the value of FPS, so if we change it and let the animation play, it changes the speed of movement - we can see the comparison of speeds with values 5 and 30 in the video. The program also calculates and displays the current time of the animation for the selected frame next to the buttons on the timeline (after entering the time, the pointer jumps to the computed position on the timeline).
Action and ActionScript
The last thing that belongs to the timeline are the ActionScript commands. For each keyframe we can open the Action panel and write a programming code. We will use only basic commands like the command Stop which can stop the animation in any place. Its usage is shown in the following video (commonly it is used at the end of the animation to stop it, otherwise it would be looped forever).
The bookmark with actions is located in the same panel as the Timeline or it can be shown by F9 key. There are many commands besides the Stop command such as GoToAndStop which skips to any frame and stops the animation or GoToAndPlay which skips to any frame and continue playing.
We will use actions again when adding the button. Using the ActionScript we can write very complex algorithms which can control our presentation or program.
MotionTween Animation
There was a sample animation in one of the previous videos and that animation was created frame by frame. It is clear that creating a longer or more complex animation using this method is not possible.
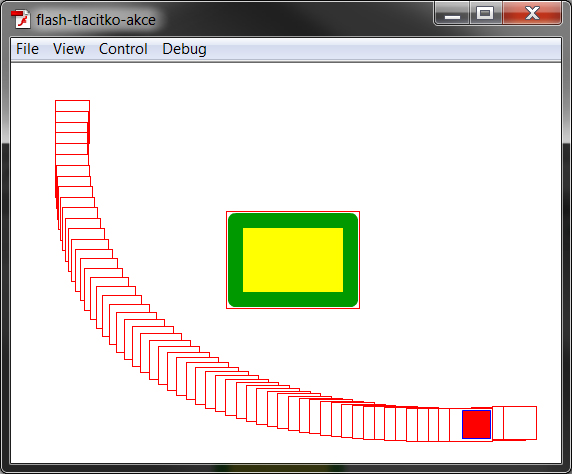
For movement in the scene we can use the MotionTween feature. We have to enter the beginning and the ending position of the object and this feature will automatically compute every frame in the range. We will get a smooth animation and we can also edit the path as a curve. It is also possible to add acceleration or deceleration.
Be aware that the MotionTween animation can work with symbols only so you have to convert objects to symbol before applying it. In case you forget to convert objects to symbol you are asked to do so after selecting Create Motion Tween command.
- Prepare a keyframe with an object of rectangle and make sure that FPS value is set to 12.
- Then go to frame 24 and press F5 to create a row of common frames until the frame 24.
- Select every frame (by holding the shift key or by clicking and dragging with the left mouse button) and from the context menu (right button) select Create Motion Tween. The program will ask you whether to convert objects to symbol if you forgot to do it before so confirm the dialog.
- The last thing which is missing is creating a keyframe at position 24 or 25, the result will be almost the same.
- We have created an animation where we can move the object in the frame 1 or 24 (25) and if we select another frame we see that the movement was divided into all frames between 1 and 24 (25). The path is drawn and we can edit it. The animation is complete, perfectly smooth and it took only a few seconds.
- There is no problem to use the Selection tool to change the path to a curve and edit it as you wish. Using the SubSelection Tool you can edit the curve like a Bezier curve. The object will follow the path while moving.
- The same technique can be used to compute rotations and transformations. You should pay attention to change parameters in the first or in the last frame of the animation only, otherwise you can make the animation corrupted or disable it.
MotionTween allows you to create new type of animations but this is not the end. You can control the progress of the animation in the Motion Editor panel where you can edit coordinates, angles, transformations and there is an option to set the acceleration or deceleration of the speed. Using acceleration is shown in the following video.
ShapeTween Animation
The ShapeTween animation is very similar to the MotionTween animation but it is used to change the shape of objects. The creation is the same as for MotionTween and you do not have to convert the object to a symbol. Then you should add blank frames and apply the ShapeTween animation on them. At the end of the ShapeTween you should create a keyframe and change the shape of the object in this frame.
The program will compute the frames between to make the animation smooth. Usage of the ShapeTween animation is illustrated in the following video.
Button
The Button is one from the three types of symbols and has its special functions. We can imagine a button as a classic button in your browser, or in a program and as such classic button it also acts. We know that the button does not look the same in all situations. It has one appearance for normal state and another for a moment when you move the cursor on it and even another if you press it. In Flash, we have to design all these states using its own Timeline.
A button can be linked to any action from confirming dialogues to redirecting to websites, sorting lists and more, we just have to program it properly.
The following video illustrates creation of a button and defining its appearances, the second video below it shows an advanced technique how to add an action (event) for the button and use it to control the animation.
- Click using the right mouse button inside the Library panel and choose to create a new symbol of type Button, set any name.
- A working canvas will open for the button. There are 4 states instead of the Timeline and these states acts like the keyframes.
- Begin with the Up state which is required. The button will look like this when only placed into a document. The center of the workspace is marked with the cross but you can draw the button absolutely arbitrarily.
- Click on the second state marked Over and press F6. None of the states Over, Down and Hit are required, if you do not create them, the button will not change. The button will come into Over state when you hover a cursor over it. Change the color to signalize a variation.
- Continue with Down state similarly - the button will come into this state when you press it so change the color again to signalize another variation.
- The Hit state is not used in every cases, there is no need to change color because only the shape of the object is taken. This area creates the range where the button is clickable (imagine a button created of many small dots - it would be impossible to click on a dot, so you can create an rectangular area around the dots and the user can click inside this area.
- Escape the working canvas of the button, return to the scene and add the button symbol.
- Using Ctrl+Enter create an immediate preview and try to hover mouse over it and then click the button. If everything is allright, it should change its appearance as described.
Advanced Sample with a Button
This sample is not compulsory; the source code is available below the description of the video.
- Use the created button from the previous sample and add any animation into a new layer (stretch the animation to 60 frames). There is a rectangle inside the video which flies around a curve.
- Add a new layer to be able to insert a code for the button. It is required to set a name to the button in Properties panel in the top right corner. Set the name as myButton.
- Click inside the first frame of the new layer and press F9 which
opens the actions panel. We will add a new event to the button using
the addEventListener function (the first parameter
is the action of a user which launches this events and the second
parameter is a function which will be launched). It
is no coincidence that
the name of the button is the same as the first word in the code -
we assigned it a name to be able to add it an event using the
ActionScript.
Is it not necessary to understand the code but if you set everything allright and copy it, you should see the result.
Insert the Stop command inside the function - in case that an user clicks the button, the animation will stop. - Nothing more remains than trying the button. Press Ctrl+Enter and try to press the button while the animation is playing. In an ideal situation the animation should stop, otherwise something is wrongly programmed.
- The final project can be downloaded here.
function mouseDownHandler(event:MouseEvent):void {
stop();
}
Export of the Scene
When we have a completed scene, we can export it to let anyone play it without Adobe Flash Professional.
The command from menu File > Export offers three basic possibilities but we are interested only in two of them:
- Export Image
Export of a single frame into an image format (jpg, gif, bmp, png, ) or to the swf format, the currently active frame will be exported. - Export Movie
Export of the whole scene into a video format (avi, mov), a sound format (wav), a sequence of images (jpg, gif, png) or to the swf format. To be able to play a swf video you have to install the Adobe Player and this format can be also inserted into a web page.
Adobe Flash Professional allows us to create an immediate preview by pressing Ctrl+Enter while creating an animation. In the Control menu you can control the playback (Stop/Play, Rewind to rewind the animation to the beginning or you can browse the frames of the animation), you can use the option to Simulate Download from the View menu and set the speed of simulated connection - the program then tries to simulate downloading such a video from a server inside a browser.
The last option from View menu is called Show Redraw Regions. This option draws edges of objects from every passed frame and let them be drawn throughout the whole animation.
Additional Texts
Questions and Exercises
- Create an animation intro for a bedtime story which will be suitable to be presented and will be minimally 15 seconds long (set FPS to 12). You can import external files and use MotionTween and ShapeTween animations.
- A bonus: create an animation like the animation in the advanced sample part and add another button which will start the whole animation after stopping it (you can try starting it from the position it was stopped or starting it from the frame 1).