
Adobe Bridge II - Practical Examples
 Content of the lesson:
- Assignments of Practical Tasks
- Solutions of Practical Tasks
Assignment
- Save this archive of photos (foto.zip) to your computer, extract it to a folder and display the content of the folder in the application Adobe Bridge.
- Create a collection "Foto“ which will contain all photos from the archive.
- Set the keywords for the photos from this collection according to the file data.txt.
- Rate all photos from 1 to 5. Five photos should be rated with "5 stars"!
- Create an automatic collection "Architecture" which will contain only photos with keyword "Architektura" and another automatic collection "Animals" which will contain only photos with keyword "Zvíře".
- Create a PDF file in maximal size to be displayed vertically (without using the automatic presentation) from the photos in collection "Architecture" which are rated with 5 stars.
- Create a web album with layout "Slideshow" from the photos in collection "Animals".
Solution
1. Save this archive of photos (foto.zip) to your computer, extract it to a folder and display the content of the folder in the application Adobe Bridge.
Files to be downloaded: foto.zip
You should create a new folder on your disk (we will use the folder "h:\ukol_bridge" in this solution but you can choose a different one folder of course) and extract all files from the archive into it. To extract files from a zip archive you can use a part of Windows or any external program (like WinZip).
image 1
Once the folder is created launch Adobe Bridge (see the first image) and find the path to your folder inside the Folders panel (marked with red in the following image). Then you should see the content of the folder inside the Content panel (marked with green in the following image).
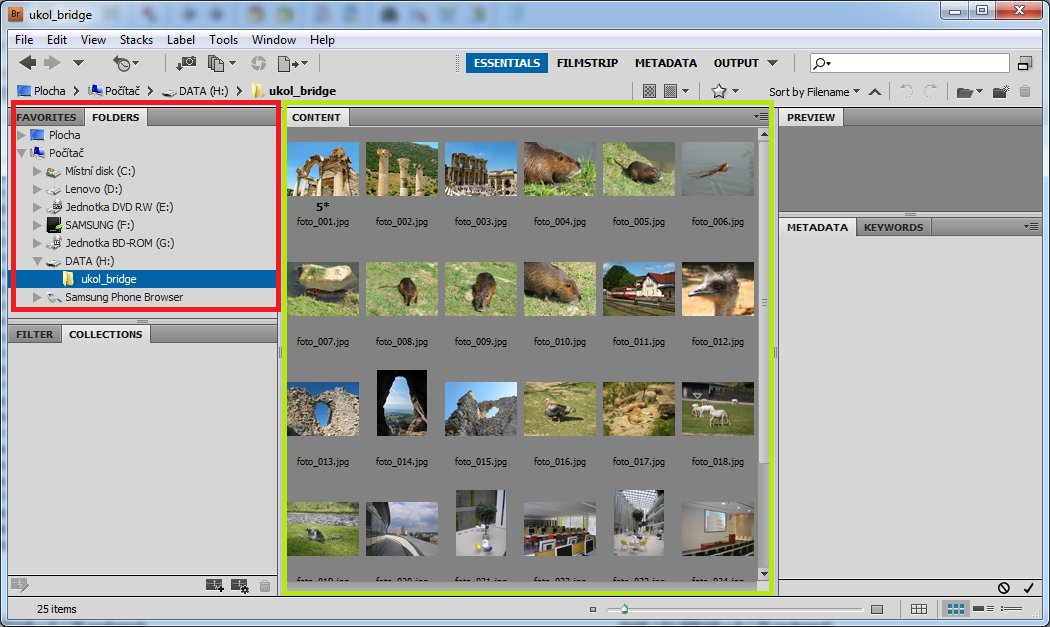
image 2
2. Create a collection „Foto“ which will contain all photos from the archive.
You have to select all photos which were extracted into the folder in step 1. You can do this by pressing CTRL+A or by the command Edit>Select All from the menu.
Then you should click on the button "New Collection" in the Collections panel (see the image 3) and answer the dialogue whether the selected photos should be placed into the collection. Then you can set the name of your collection.
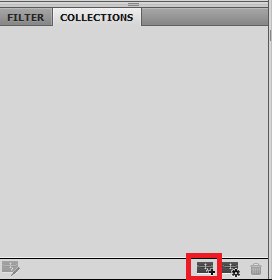
image 3
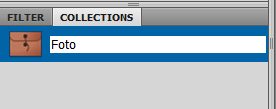
image 4
3. Set the keywords for the photos from this collection according to the file data.txt.
In this step you will set keywords for all photos. If you look inside the file data.txt you will see that 6 different keywords are used for all photos:
- Architektura
- Slovensko
- Turecko
- Zlínský kraj
- Zvíře
- Zoo
You can create new keywords to speed up your work and then set the keywords for each photo by ticking the right checkboxes.
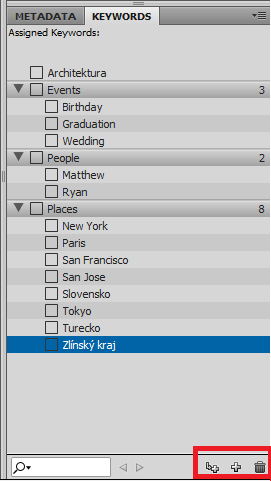
image 5
Keywords can be managed inside the Keywords panel which is located in the right bottom part of the program window. For creating and removing keywords you can use the three buttons which are highlighted with red color in the previous image. They are ordered in this way:
- New keyword which will be a sub-item of the selected keyword
- New keyword
- Remove the selected keyword
In case of creating a new keyword which will not have a parent keyword (the keyword "Architektura" for example) you will use the second button - "New Keyword" and then enter the title of this keyword.
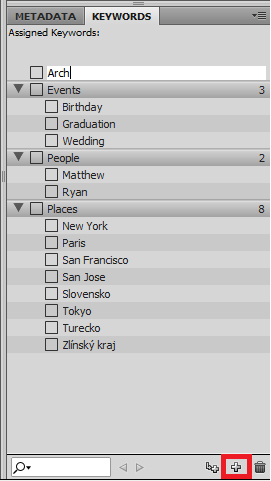
image 6
In case you want to use sub-categories, that means you want to create a keyword which will be inserted as a sub-item of a parent keyword (for example "Zvíře" > "Zoo") you have to choose the keyword where you want to add the sub-category and click on the first button. Then you can enter the title of this keyword.
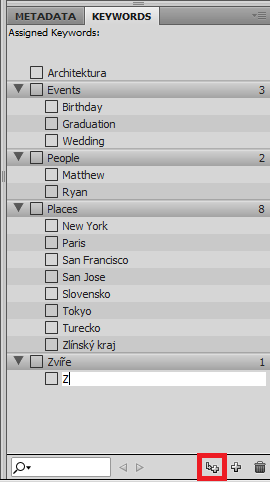
image 7
The list should look like the following one after adding all keywords. Newly added keywords are highlighted.

image 8
To choose the keywords you have to gradually select each photo and tick the right keywords for it (shown in the image 9).
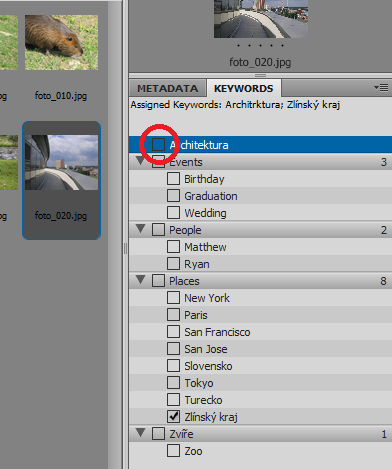
image 9
4. Rate all photos from 1 to 5. Five photos should be rated with "5 stars"!
You will set the rating of photos in this step. As mentioned in the assignment you should set maximal rating for 5 photos because these photos will be used in the following task.
You can set the rating using one of these ways:
- Click on the number of stars below the photo in the list (to set four stars you have to click on the fourth dot under the preview, see the image 10)
- Section "Rating" in the "Label" menu
- Key shortcut Ctrl + 0 for zero rating and Ctrl + 5 for maximal rating
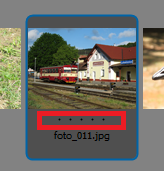
image 10
To set all ratings you only have to browse all your photos and set the ratings using one of the ways mentioned in the previous part.
5. Create an automatic collection "Architecture" which will contain only photos with keyword "Architektura" and another automatic collection "Animals" which will contain only photos with keyword "Zvíře".
You will have to use the tool "New Smart Collection" in this case - you can find this function in the bottom part of the Collections panel, the button is highlighted in the following image.
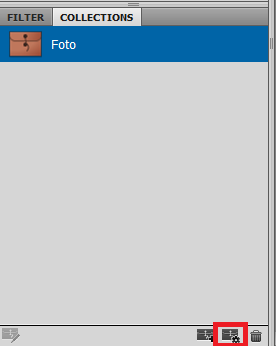
image 11
After clicking on the button a new dialogue window appears and you can set conditions for the new collection. You need to set the path to files (you should choose the item "Browse" inside the "Look in" list and find the path to your folder) and then the condition should be set (in our case "Keywords" > "contains" > "Architektura"). Other conditions will remain as in the following image and you will click on the button "Save" to confirm the dialogue.
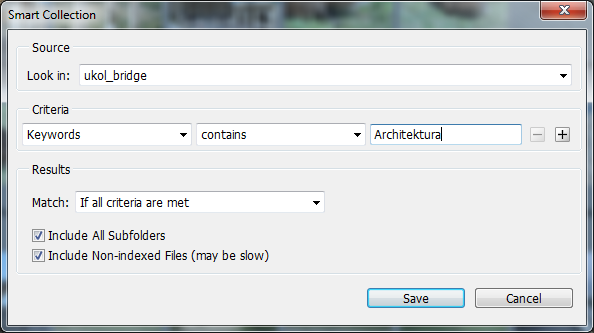
image 12
Then you only have to enter the name of the collection and the selection is finished.
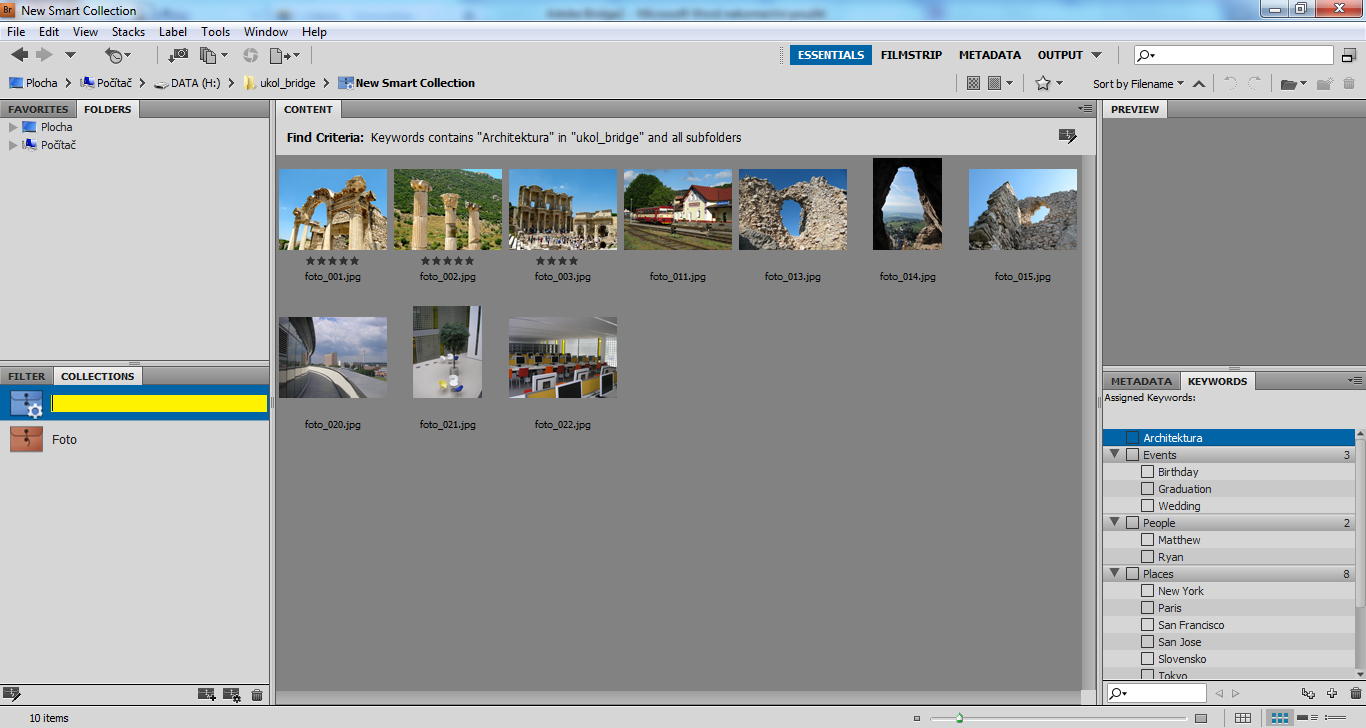
image 13
You will repeat the same procedure for the collection "Animals", you only have to change the keyword and the name of collection.
6. Create a PDF file in maximal size to be displayed vertically (without using the automatic presentation) from the photos in collection "Architecture" which are rated with 5 stars.
Before generating the output it is necessary to choose the required photos (see the image 14). Choose the collection "Architecture" inside the Collections panel (the panel which is highlighted in red in the following image) and set the rating filter to 5 stars (highlighted in green in the following image).
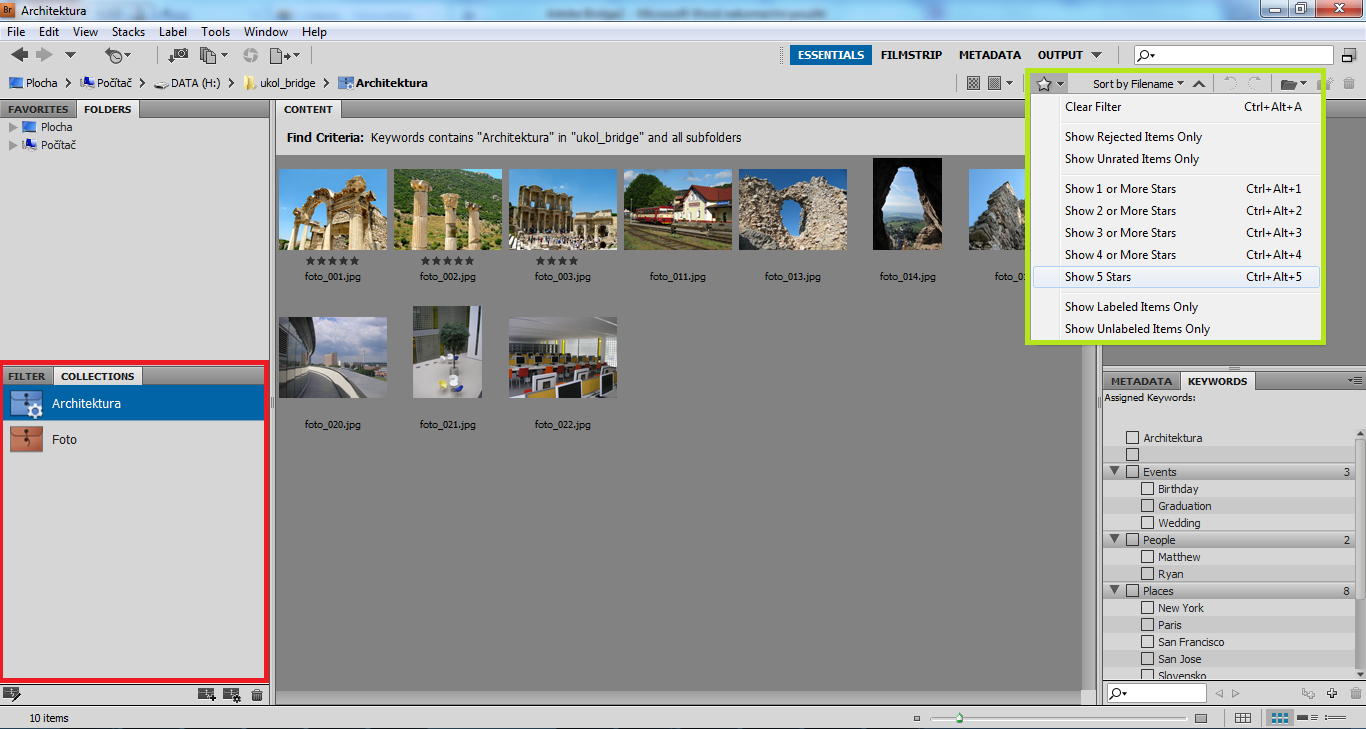
image 14
Select all displayed photos after applying the filter and choose to create a new PDF document. To create a new PDF document you can use the "Output" button (see the image 15) which has only one option - "Output to Web or PDF". After clicking on this button a side panel will appear and you will be able to use other settings.
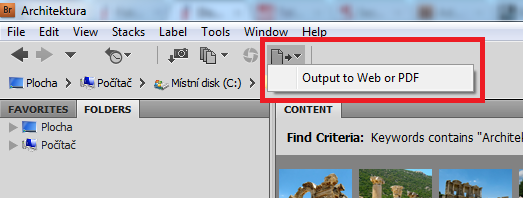
image 15
You can choose a new PDF document or a web gallery in the side panel. We will choose the PDF document in this case and set the following parameters:
- Template: Maximize size
- Turn off the option "Rotate for best fit" to get a result without being rotated
- Turn off all settings in the section "Playback"
To finish all settings save the document using the "Save ..." button.
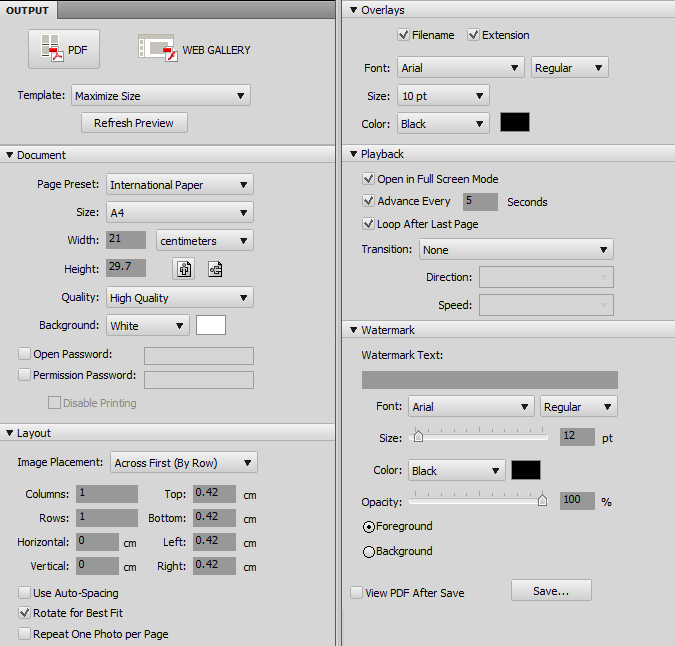
image 16
7. Create a web album with layout "Slideshow" from the photos in collection "Animals".
You have to choose the collection "Animals" in this step and select all photos inside it. Then select the command "Output to Web or PDF …“ (see the image 16).
Choose the option "Web gallery" inside the side panel (see the image 17) and make the following changes.
Select the template "Slideshow", set information about the gallery and you can change the color scheme. You can check the result anytime by pressing the button "Preview in Browser".
To finish the settings choose the action "Create Gallery" and the option "Save to Disk". You can set the path to folder where the final gallery will be saved.
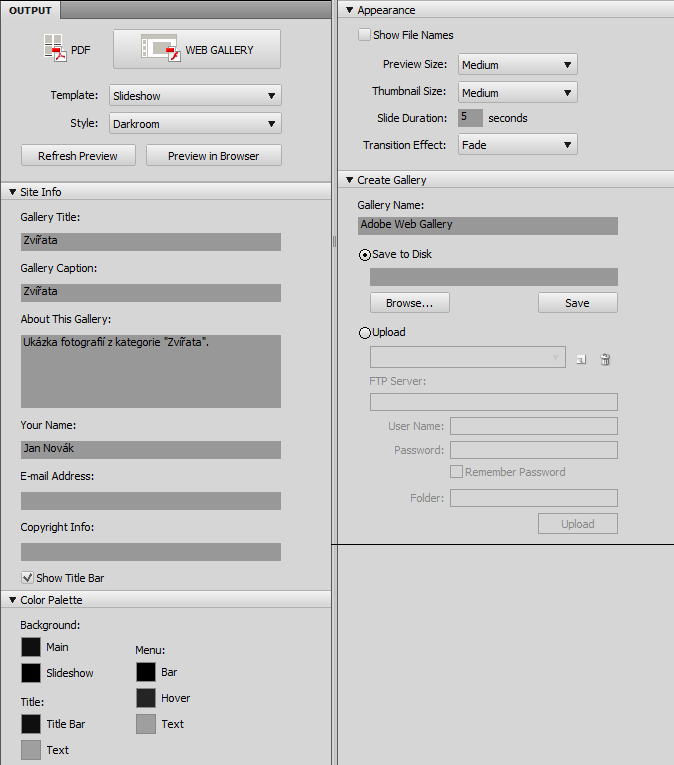
image 17