
Vanishing Point
 In this lesson:
- Usage of vanishing point
- Simple application of vanishing point
- More complicated project
- Other example of use
Usage of vanishing point
Vanishing point has variety of usage, but all of them lie in the possibility of inserting text, picture or other object into photo so that inserted object copy the area in the photo.
In practise, this means that we are able to create cover of the box and place it directly on the box. We are also able to place advert directly on billboard. It's also possible to copy any shape because Adobe Photoshop can fit inserted object with maintenance of the perspectiive.
Simple application of vanishing point
At the beginning, we present really simple usage of vanishing point - we create simple cover of the juice box. Box won't be amazing, but in this presentation will be demonstrated how to use vanishing point. We will do more complicated project after this easy example.
The video below describes this project.
- Insertthe box to Adobe Photoshop.
- Create new layer and draw random shape into it. Rasterize the object.
- Mark shape at the new layer (hold CTRL and click on the icon of layer) and Copy it (CTRL+C).
- Create new layer and make this layer invisible. Cancel marking (CTRL+D).
- Choose menu Filter > Vanishing point. Window with this tool will be opened.
- Choose Create Plane Tool to define the first rectangle in perspective. This will be front side of our box. The rectangle could be marked as red or yellow instead of blue. This means that rectangle is not well defined so you have to shift corners to right position.
- Next step is to define side part of the box. Switch to the second icon in the left column (Create Plane Tool). Drag the middle of the rectangle and spread the side. Side won't be spread exactly so drag other corners to the right position.
- Insert copied object (CTRL+V) at any position . The exact deformation will be calculated automatically by Photoshop and object will be changed.
- Repeat step 7 but drag the side part of the box. Add cap too.
- Try to insert other object at the corner of the box. The deformation will be calculated automatically again.
- We inserted some text and let it rasterize and use Vanishing point. Photoshop does the same process as before.
- If you want to color in any area, mark the front side, make new layer and fill it with any color. Copy layer and make it invisible. Cancel marking (Vanishing points will be aplied only to this selection).
- Background could be inserted at any sideof the box (repeat same process).
- At the end, move background layer down in order to see text and ornaments.
More complicated project
We make coffee and tea box in this part. It means that box will have more interesting front side and title on the top.
You have to experiment with size of rectangle because it's difficult to estimate degree of reduction into space. Rectangle could be too small or too big sometimes.
We need to download these files:
picture of the box,
picture of coffee,
cup and tea,
composition
All these pictures are modified so we can use it in our project. Composition of tea is not real so we can replace it by more suitable titles or tables.
The process is described in video below, you have to stop it after any step (steps are precisely described in this text).
- Open picture of the box.
- Create new document with rezolution 2535*1326 pixels. Make brown stripe there (according to video)
- Add coffee beans (means of two layers) - it's possible to use Layer Mask and make it more smoothly.
- Color in the side of box with the same color.
- Add picture of coffee twice. Use Layer Mask. There will be everything in white background at the first layer and stray tea will be at the second layer. Apply Opacity and Fill 40%.
- Add titles (according to video) and use suitable styling.
- Copy whole document (CTRL+SHIFT+C), insert Vanishing points according to previous instruction. Insert picture and place it to the box (to the front and sie). If picture is too big or too small, you have to resize it (to width) symetrically. You have to enlarge other elements too. Repeat these steps, if it's necessary.dle instrukcí z předchozího příkladu a vložíme obrázek (CTRL+V). Napasujeme jej, aby zaujímal přední a boční stěnu.
If you using Vanishing points it's possible Transformation (T), so you can reduce picture at defined area. Don't forget to keep proportion. - Use composition picture and edit the side of our box (make new document with resolution 1057*1148 pixels). It's not necessary to create background because previous picture is placed on the box.
- Edit this picture using Vanishing points.
- Create new document (top of the box) and insert the picutre of coffee beans. This document will be added on the top of our box, so it's necessary to experiment with composition and document size in order to cover whole top of our box and create effect with coffee beans (transition from front to top).
- Add this document to our box using Vanishing points.
- Create title at on the top using suitable font and white color. We could prove it. It's not important what is written in the title but it has to be related to theme of our box.
- Create side title TEA & COFFEE, using lighter color again.
- Add these titles using Vanishing points.
- The box is done and ready for presentation.
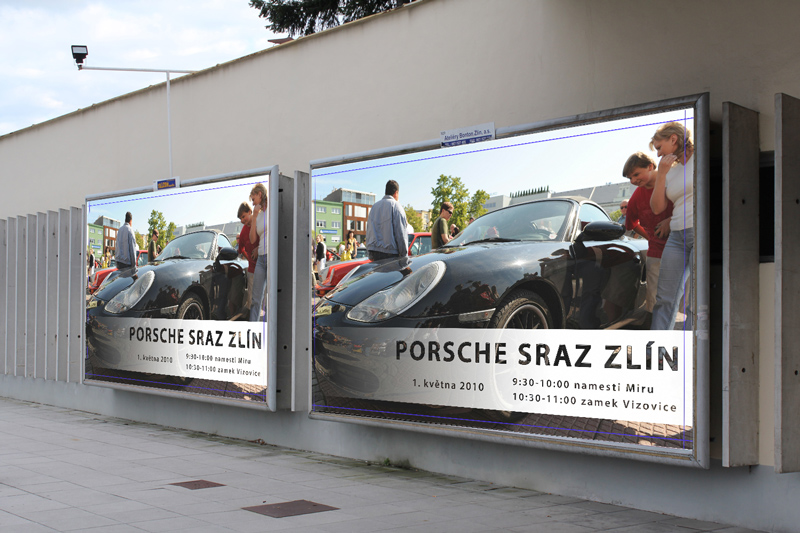
Other example of use
Now, we present other examples of usage Vanishing point. All photos are ready to use in yours documents.
Two photos (with prepared area) are ready to download here:
billboard 1,
pozadí 1,
billboard 2,
pozadí 2a,
pozadí 2b,
pozadí 2c,
The process is described in video below, you have to stop it after any step (steps are precisely described in this text).
- Open file with background, mark all (ALT+A) and copy it (CTRL+C).
- Open files with billboards create new layer and use Vanishing point to set area on one of billboards.
- Insert background (CTRL+V) and use Transformation tool (T).
- You can resize the object without any loss of quality until you press ENTER.
- Confirm Transformation and Vanishing point by pressing ENTER.
- Use same steps in order to prepare the second billboard.
- After confirmation we have ready these billboard at other layers than photo..
Set Opacity to 80-90% in order to make billboards faded. They are too bright and perfect what doesn't look naturally. These billboards are edited modified below this text. Made-up titles was added to the second picture.
Further reading
Questions
- Describe process how to add picture to object in pespective.
- Why does the color sometimes change from blue to red or yellow when you're using Vanishing point? How you can fix it?