
JavaScript and jQuery - Accessories
 Content of the lesson:
- What are plugins and where to find them
- Displaying photos using the "jCarousel" plugin
- Constructing menu using the "Apycom jQuery Menus" plugin
Plugins
The library jQuery offers large possibilities of creating dynamic
WWW pages. Construction of several applications in jQuery can be quite
difficult so there is a database of several extensions (so called
plugins) for jQuery which offers completed implementations of several
functions where you only have to make a few adjustments and then you can
add them to your WWW page (of course you have to keep the license terms
- several plugins are free but some of them are paid).
Single plugins
can be found (together with a detail description) for example at the
official website plugins.jquery.com.
Plugins are JavaScript programs which are used to get an effect without the need to create it by hand. The advantage is the speed and efficiency of work. Plugins are usually tested with minimum of errors and are better for us than creating our own effects.
In this lesson we will try the implementation of two plugins: jCarousel and Apycom jQuery Menus.
Sample of Using the jCarousel Plugin
Now we will extend our website with a similar effect as used at the
website of Komerční banka.
To gain a similar effect you can use plenty of plugins, but we will use
jCarousel.
Using this plugin you can simply create a gallery where single images will be gradually and automatically displayed. For the construction of our website we will need files with photos and the jCarousel plugin with the library jQuery. These files can be downloaded in this archive: jcarousel.zip.
In the page with the sample 'Carousel with autoscrolling' you can see that this effect is very similar to the one we wanted. There are three images changing in the sample and we want to change one only. If you look into the configuration of this plugin you can see several properties which can be adjusted. If you do not know what each property does, you can see the description.
We are mostly interested in these properties:
- scroll - the number of items to scroll
- auto - the time interval in seconds to change items
- wrap - the action after reaching the end of the list. You can specify to return from the end to the beginning ('last') or to continue from the beginning to the end again ('circular').
- initCallback - function which is called after initializing the plugin. Sample
As you can see in the
documentation every item is placed in the unsorted list (<ul><li>).
You should put the content which you want to be gradually changed into
tags <li>. In case you open the file galerie.html you will see
predefined structure.
		  <!DOCTYPE html PUBLIC "-//W3C//DTD XHTML 1.0 Transitional//EN" "http://www.w3.org/TR/xhtml1/DTD/xhtml1-transitional.dtd">
<html xmlns="http://www.w3.org/1999/xhtml">
<head>
<meta http-equiv="Content-Type" content="text/html; charset=UTF-8" />
<title>Ukázka fotogalerie jCarousel</title>
</head>
<h1>Ukázka fotogalerie jCarousel</h1>
<ul>
<li><img src="foto/1.jpg" style="width: 300px; height: 225px;" /></li>
<li><img src="foto/2.jpg" style="width: 300px; height: 225px;" /></li>
<li><img src="foto/3.jpg" style="width: 300px; height: 225px;" /></li>
<li><img src="foto/4.jpg" style="width: 300px; height: 225px;" /></li>
<li><img src="foto/5.jpg" style="width: 300px; height: 225px;" /></li>
<li><img src="foto/6.jpg" style="width: 300px; height: 225px;" /></li>
</ul>
<body>
</body>
</html>
Our main task is to add links to required files in which the jCarousel is defined. This means the library jQuery, jCarousel and the css file with styles (you will find 2 basic stylesheets inside the jCarousel archive: ie7 nda tango, we will use the tango stylesheet).
The file with the tango style is already quite adjusted (compared to the version at official website jCarousel - we changed sizes of single elements to correspond with the used images (in case you want to use another dimensions of the images, you have to rewrite the css style skins/tango/skin.css).
Now we can move back to the file galerie.html. We have to add links for Javascript libraries and the css file into the header of the new document.
		  <!DOCTYPE html PUBLIC "-//W3C//DTD XHTML 1.0 Transitional//EN" "http://www.w3.org/TR/xhtml1/DTD/xhtml1-transitional.dtd">
<html xmlns="http://www.w3.org/1999/xhtml">
<head>
<meta http-equiv="Content-Type" content="text/html; charset=UTF-8" />
<title>Ukázka fotogalerie jCarousel</title>

<link rel="stylesheet" type="text/css" href="skins/tango/skin.css" />
<script type="text/javascript" src="jquery-1.5.min.js"></script>
<script type="text/javascript" src="jquery.jcarousel.min.js"></script>

</head>
<h1>Ukázka fotogalerie jCarousel</h1>
<ul>
<li><img src="foto/1.jpg" style="width: 300px; height:: 225px;" /></li>
<li><img src="foto/2.jpg" style="width: 300px; height:: 225px;" /></li>
<li><img src="foto/3.jpg" style="width: 300px; height:: 225px;" /></li>
<li><img src="foto/4.jpg" style="width: 300px; height:: 225px;" /></li>
<li><img src="foto/5.jpg" style="width: 300px; height:: 225px;" /></li>
<li><img src="foto/6.jpg" style="width: 300px; height:: 225px;" /></li>
</ul>
<body>
</body>
</html>
In case you tried to view the page inside a browser you would find
out that nothing would change. Libraries were added but we need to
launch a function after loading the page to add functionality.
At first add a class for the list, concretely jcarousel-skin-tango
to be able to apply the appearance according to the needs of the
jCarousel library and then for the tag ul add the
identifier foto which will be referred in Javascript.
Now we can implement the Javascript code which will be launched after loading the page. You can see the tag script which is written in bold. We will assign a function to the event ready and this function will assign the function jCarousel for all lists with identifier foto.
		  <!DOCTYPE html PUBLIC "-//W3C//DTD XHTML 1.0 Transitional//EN" "http://www.w3.org/TR/xhtml1/DTD/xhtml1-transitional.dtd">
<html xmlns="http://www.w3.org/1999/xhtml">
<head>
<meta http-equiv="Content-Type" content="text/html; charset=UTF-8" />
<title>Ukázka fotogalerie jCarousel</title>
<link rel="stylesheet" type="text/css" href="skins/tango/skin.css" />
<script type="text/javascript" src="jquery-1.5.min.js"></script>
<script type="text/javascript" src="jquery.jcarousel.min.js"></script>

<script type="text/javascript">
$(document).ready(function() {
	$('#foto').jcarousel({

	});
});
</script>

</head>
<h1>Ukázka fotogalerie jCarousel</h1>
<ul id="foto" class="jcarousel-skin-tango">
<li><img src="foto/1.jpg" style="width: 300px; height:: 225px;" /></li>
<li><img src="foto/2.jpg" style="width: 300px; height:: 225px;" /></li>
<li><img src="foto/3.jpg" style="width: 300px; height:: 225px;" /></li>
<li><img src="foto/4.jpg" style="width: 300px; height:: 225px;" /></li>
<li><img src="foto/5.jpg" style="width: 300px; height:: 225px;" /></li>
<li><img src="foto/6.jpg" style="width: 300px; height:: 225px;" /></li>
</ul>
<body>
</body>
</html>
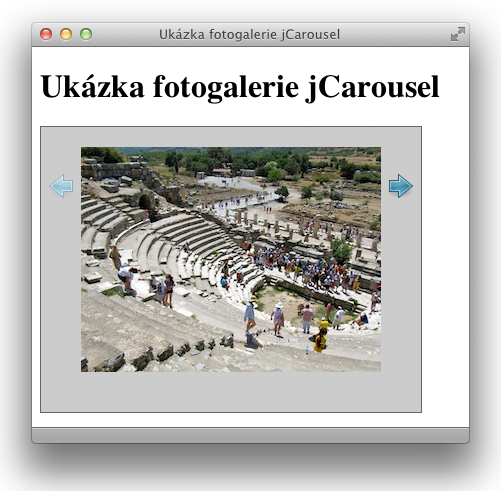
Our gallery looks like the previous image at this moment. However, we have to adjust the behavior of this application. The images are currently changing after three and in case that the last image is played you have to manually click back to the beginning.
We have to add settings for the jCarousel extension which were described at the beginning. We will add the value scroll which sets how many images should be moved when clicking on the arrow. The default value is 3 and we will change it to 1.
Then we can set the property wrap which can be set to circular and continues with the first image after reaching the last image. After setting these values the function $(document).ready will contain the following source code:
...
<script type="text/javascript">
$(document).ready(function() {
	$('#foto').jcarousel({
		scroll: 1,
        wrap: 'circular'
	});
});
</script>
...
Now the images are changing after one and create an infinity loop.
We will even more expand the script. We want the images to be changed automatically with a particular period which can be set in seconds. This period has to be set using the auto parameter, according to the following example.
...
<script type="text/javascript">
$(document).ready(function() {
	$('#foto').jcarousel({
		scroll: 1,
        wrap: 'circular',
        auto: 1
	});
});
</script>
...
After adding the code and refreshing the page all photos will change automatically. Arrows are still there and are not used. Imagine that the animation will stop and you will be able to switch photos manually in case that you hover mouse cursor above the photos or click on the arrows. We will use another function for this purpose and assign the property initCallback to it. Before describing the function you should see the complete code of the final script.
		  <!DOCTYPE html PUBLIC "-//W3C//DTD XHTML 1.0 Transitional//EN" "http://www.w3.org/TR/xhtml1/DTD/xhtml1-transitional.dtd">
<html xmlns="http://www.w3.org/1999/xhtml">
<head>
<meta http-equiv="Content-Type" content="text/html; charset=UTF-8" />
<title>Ukázka fotogalerie jCarousel</title>
<link rel="stylesheet" type="text/css" href="skins/tango/skin.css" />
<script type="text/javascript" src="jquery-1.5.min.js"></script>
<script type="text/javascript" src="jquery.jcarousel.min.js"></script>

<script type="text/javascript">

function foto_initCallback(carousel)
{
	carousel.buttonNext.bind('click',function() {carousel.startAuto(0);});
	carousel.buttonPrev.bind('click',function() {carousel.startAuto(0);});

	carousel.clip.hover(
		function() {carousel.stopAuto(); },
		function() {carousel.startAuto(); }
	);

}

$(document).ready(function() {
	$('#foto').jcarousel({
		scroll: 1,
        wrap: 'circular',
        auto: 1,
        initCallback: foto_initCallback
	});
});
</script>

</head>
<h1>Ukázka fotogalerie jCarousel</h1>
<ul id="foto" class="jcarousel-skin-tango">
<li><img src="foto/1.jpg" style="width: 300px; height:: 225px;" /></li>
<li><img src="foto/2.jpg" style="width: 300px; height:: 225px;" /></li>
<li><img src="foto/3.jpg" style="width: 300px; height:: 225px;" /></li>
<li><img src="foto/4.jpg" style="width: 300px; height:: 225px;" /></li>
<li><img src="foto/5.jpg" style="width: 300px; height:: 225px;" /></li>
<li><img src="foto/6.jpg" style="width: 300px; height:: 225px;" /></li>
</ul>
<body>
</body>
</html>
We assigned a function to the property initCallback and named it as foto_initCallback. In this function we will define the event carousel.clip.hover at first. There are two functions in this event. The first one stops an automatic change of image when mouse cursor is above it, the second one again launches the animation.
Then we have to define two more events. The buttons carousel.buttonNext and carousel.buttonPrev are assigned to the event click which sets the speed of switching to 0 (the automatic switching is disabled).
The sample of using jCarousel is completed after this step. You can find another possible implementations in the documentation of this extension.
Construction of Menu Using the "Apycom jQuery Menus" Plugin
The second example of extension is the plugin "Apycom jQuery Menus". This plugin is used for easy construction of a multilevel menu.
The files for this example can be found in the archive apycommenu.zip. There is only one variant of the appearance of menu, you can get more variants at website www.apycom.com".
If you extract the archive you will find css file with the settings of styles, the jQuery library, the definition of Javascript for the menu, folder with needed images and file with a sample implementation.
<!DOCTYPE HTML PUBLIC "-//W3C//DTD HTML 4.01 Transitional//EN" "http://www.w3.org/TR/html4/loose.dtd">
<html>
<head>
    <meta http-equiv="content-type" content="text/html;charset=utf-8" />
    <title>Style 01 (Yellow Green) - Menu by Apycom.com</title>
    <link type="text/css" href="menu.css" rel="stylesheet" />
    <script type="text/javascript" src="jquery.js"></script>
    <script type="text/javascript" src="menu.js"></script>
</head>
<body>

<style type="text/css">
* { margin:0;
    padding:0;
}
body { background:rgb(74,81,85); }
div#menu { margin:5px auto; }
div#copyright {
    font:11px 'Trebuchet MS';
    color:#fff;
    text-indent:30px;
    padding:40px 0 0 0;
}
div#copyright a { color:#9acd32; }
div#copyright a:hover { color:#fff; }
</style>

<div id="menu">
    <ul class="menu">
        <li><a href="#" class="parent"><span>Home</span></a>
            <ul>
                <li><a href="#" class="parent"><span>Sub Item 1</span></a>
                    <ul>
                        <li><a href="#" class="parent"><span>Sub Item 1.1</span></a>
                            <ul>
                                <li><a href="#"><span>Sub Item 1.1.1</span></a></li>
                                <li><a href="#"><span>Sub Item 1.1.2</span></a></li>
                            </ul>
                        </li>
                        <li><a href="#"><span>Sub Item 1.2</span></a></li>
                        <li><a href="#"><span>Sub Item 1.3</span></a></li>
                        <li><a href="#"><span>Sub Item 1.4</span></a></li>
                        <li><a href="#"><span>Sub Item 1.5</span></a></li>
                        <li><a href="#"><span>Sub Item 1.6</span></a></li>
                        <li><a href="#" class="parent"><span>Sub Item 1.7</span></a>
                            <ul>
                                <li><a href="#"><span>Sub Item 1.7.1</span></a></li>
                                <li><a href="#"><span>Sub Item 1.7.2</span></a></li>
                            </ul>
                        </li>
                    </ul>
                </li>
                <li><a href="#"><span>Sub Item 2</span></a></li>
                <li><a href="#"><span>Sub Item 3</span></a></li>
            </ul>
        </li>
        <li><a href="#" class="parent"><span>Product Info</span></a>
            <ul>
                <li><a href="#" class="parent"><span>Sub Item 1</span></a>
                    <ul>
                        <li><a href="#"><span>Sub Item 1.1</span></a></li>
                        <li><a href="#"><span>Sub Item 1.2</span></a></li>
                    </ul>
                </li>
                <li><a href="#" class="parent"><span>Sub Item 2</span></a>
                    <ul>
                        <li><a href="#"><span>Sub Item 2.1</span></a></li>
                        <li><a href="#"><span>Sub Item 2.2</span></a></li>
                    </ul>
                </li>
                <li><a href="#"><span>Sub Item 3</span></a></li>
                <li><a href="#"><span>Sub Item 4</span></a></li>
                <li><a href="#"><span>Sub Item 5</span></a></li>
                <li><a href="#"><span>Sub Item 6</span></a></li>
                <li><a href="#"><span>Sub Item 7</span></a></li>
            </ul>
        </li>
        <li><a href="#"><span>Help</span></a></li>
        <li class="last"><a href="#"><span>Contacts</span></a></li>
    </ul>
</div>

<div id="copyright"><a href="http://apycom.com/">jQuery Menu by Apycom</a></div>

</body>
</html>
You can see that the implementation is very simple, you have to link the required JS and CSS files and create the menu as a multilevel list. The block which contains menu should have the identifier menu and the style of list should also be set for menu.
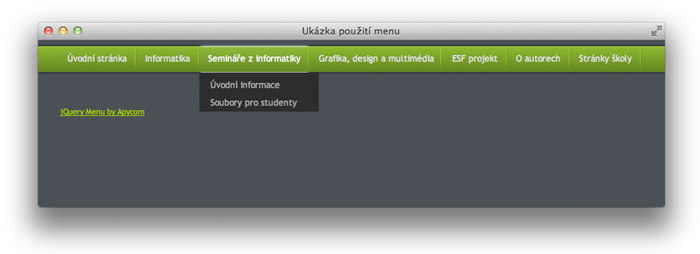
You can create your own menu by simply adjusting this website. We will use the menu at website IVT GJŠ Zlín for example. After adjustments the code should change like this:
<!DOCTYPE HTML PUBLIC "-//W3C//DTD HTML 4.01 Transitional//EN" "http://www.w3.org/TR/html4/loose.dtd">
<html>
<head>
    <meta http-equiv="Content-Type" content="text/html; charset=windows-1250" />
<title>Ukázka použití menu</title>
    <link type="text/css" href="menu.css" rel="stylesheet" />
    <script type="text/javascript" src="jquery.js"></script>
    <script type="text/javascript" src="menu.js"></script>
</head>
<body>

<style type="text/css">
* { margin:0;
    padding:0;
}
body { background:rgb(74,81,85); }
div#menu { margin:5px auto; }
div#copyright {
    font:11px 'Trebuchet MS';
    color:#fff;
    text-indent:30px;
    padding:40px 0 0 0;
}
div#copyright a { color:#9acd32; }
div#copyright a:hover { color:#fff; }
</style>

<div id="menu">
    <ul class="menu">
        <li><a href="#" class="parent"><span>Úvodní stránka</span></a></li>
        <li><a href="#" class="parent"><span>Informatika</span></a></li>
        <li><a href="#" class="parent"><span>Semináře z informatiky</span></a>
        	<ul>
            	<li><a href="#"><span>Úvodní informace</span></a></li>
             	<li><a href="#"><span>Soubory pro studenty</span></a></li>
         	</ul>
        </li>
        <li><a href="#" class="parent"><span>Grafika, design a multimédia</span></a>
        	<ul>
            	<li><a href="#"><span>Úvodní informace</span></a></li>
             	<li><a href="#"><span>Práce studentů</span></a></li>
                <li><a href="#"><span>Soubory pro studenty</span></a></li>
         	</ul>
        </li>
        <li><a href="#" class="parent"><span>ESF projekt</span></a></li>
        <li><a href="#" class="parent"><span>O autorech</span></a>
        	<ul>
            	<li><a href="#"><span>Michal Mikláš</span></a></li>
             	<li><a href="#"><span>Jaromír Světlík</span></a></li>
         	</ul>
        </li>
        <li><a href="#" class="parent"><span>Stránky školy</span></a></li>
  </ul>
</div>

<div id="copyright"><a href="http://apycom.com/">jQuery Menu by Apycom</a></div>

</body>
</html>
After opening the page inside a web browser, it should look like the following image:
Interesting Plugins
Questions
- What are advantages of using plugins?
- Try to find other examples of useful plugins for jQuery.