
Colour Corrections, Film Appearance
 Content of the lesson:
- Colour Corrections
- Film Appearance
Colour Corrections:
The source video to practice: halloween
Setting the Workspace
Before we start with colour corrections of a clip, we set our workspace. We can achieve this by using menu where we choose the “Window” and “Workspace” and “Colour correction” items. This will help to lay out operator devices for these operations on a workplace optimally. This will also change the “Monitor” window. There are again two preview windows but one of them is “Program Monitor”; this window enables us to preview the result placed on a timeline. The other window is the “Reference Monitor” window which also displays the result on a timeline but its use is more specific.
Display Mode
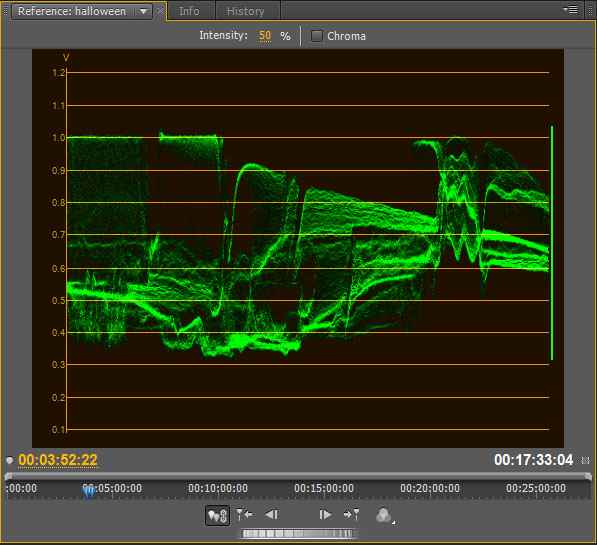
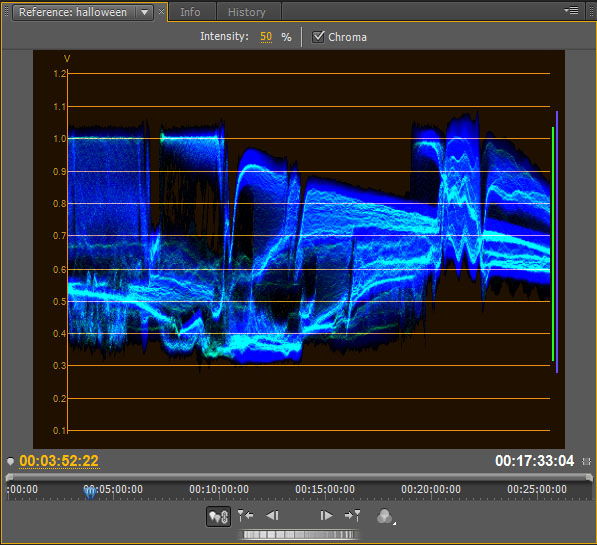
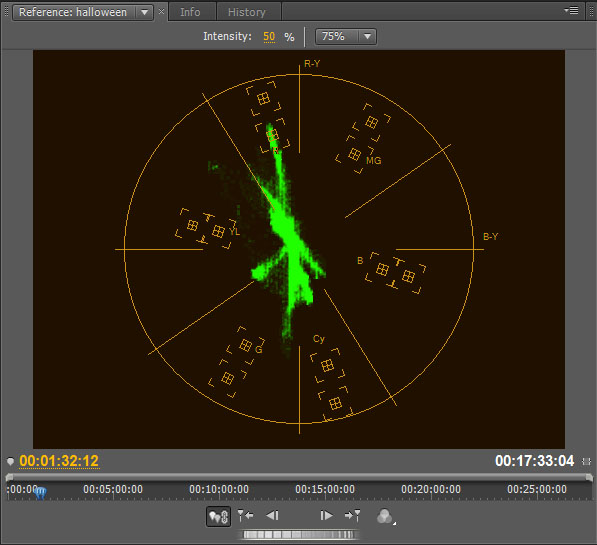
We carry out the change in the “Reference Monitor” window by clicking “Output”. We will be interested mainly in YC Waveform and Vectorscope items; so this monitor is used to display these graphs.
- waveform - this graph displays a parameter of a current shot in “Program Monitor”. The horizontal axis corresponds with the width of the scan line (the picture is usually divided into horizontal stripes called scan lines during raster scanning) and the vertical axis corresponds with signal amplitude because each such a line can be transferred in a form of an analogue signal. Dark values are displayed in the bottom part and on the other hand the light values are displayed in the upper part.
- vectorscope - this graph displays the value of a tone which is indicated by angle orientation; the value of colour is in the scope from 0 to 360° counter-clockwise. The strength of a colour or saturation is displayed as a distance from the centre of a display. Black, grey, and white colours appear in the centre and vivid colours appear outside the display.
“Three-Way Colour Corrector” Eeffect Application
We can find this effect in the “Effects” window in “Video Effects” and then in “Colour Correction”. We can also use the finder in the upper part of this window and enter the name of the effect. The application consists in clicking and moving on a block of a video. To display the effect we choose this effect in the “Effect Controls” window and drag it out to get into its setting.
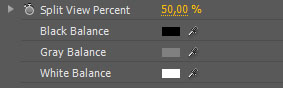
- • Balancing of white and black (display mode: waveform) – is carried out by “Black, White, or Grey Balance”. There is a small rectangle with colour and a dropper by each of these options. Using the dropper we balance the colour. Click the dropper when balancing black colour and on “Program Monitor” choose the colour for the currently displayed image which corresponds with the black colour in fact. This means that we can see not black but for example dark grey colour on the screen which should be black. The colour we can see should be black but it is wrongly displayed as dark grey. We point and click at this colour by the dropper. Doing this we balance the black colour and the program will take it as a really black one. The program then makes corrections that lead to a better final image. The same procedure is for white colour. When balancing the white colour we again choose the dropper and show the colour that should correspond with the white colour in real even though we can see it as light grey. When balancing the grey colour we set it as neutral.
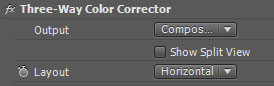
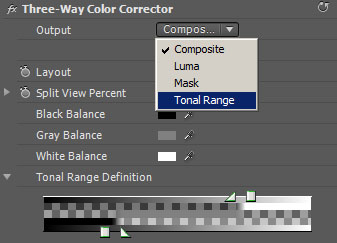
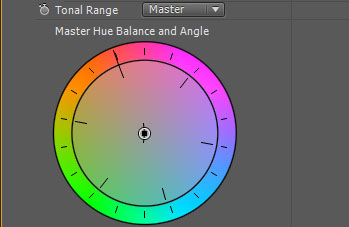
- Tonal Range Definition (display mode: waveform) – is used to set a toning scale – light places, medium hues and shades – of colour corrections. To see how the scales of these three areas change we use the item “Output” in the upper part of our effect and change the setting from “Composite” to “Tonal Range”. Now we can see light places as white colour, medium hues as grey colour and shades as black and we can change the range.
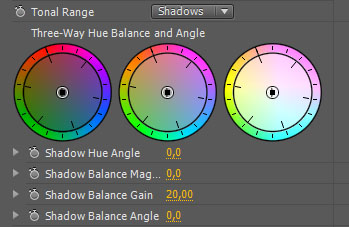
- HSL - tonal range (display mode: vectroscope) – we unroll HLS operating controls and choose the option tonal range (“Tonal Range”). There we can make corrections of light places, medium hues and shades by moving controls or inserting the value by the keyboard. This means that if we want to change the colours of shades (the paces which will be black in the previous step), we will do it by using “Shadows”. Moving the cursor in the colour we add this colour or by moving the cursor in the opposite direction we reduce the colour.
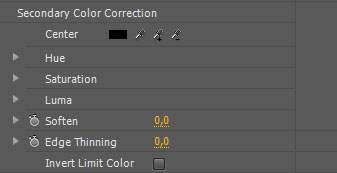
- Secondary color correction - this option is used to correct a certain colour in a clip. The “Centre” item is used where there is a small rectangle with a colour and a dropper. We can use this dropper to choose the colour in which we want to do corrections. Then we choose the option “Mask” in the “Output” item in the upper part of the effect. Now the chosen colour is seen as white while all others are seen as black. Using options we tune our choice as we need, then we switch back to “Composite” and with HSL we set the colour.
Preview
To be sure that the corrections are as we want them it is necessary to export our clip and check it on TV as well.
Example 1
The source video to practise: taekwondo
Example 2
The source video to practise: atelier
Sample
Film Appearance
"Letterboxing"
If we wanted to imitate a real film appearance, we would need to display our clip with two black stripes on the margins of the screen so that it looks like a wide shot. To do this we would have to insert so called “Black Video” (File-> New-> Black Video) into our project. Assuming the cut video was on the 1st track, we would insert the black video on the 2nd track and on to the 3rd one at the same time. Then we apply “Crop” effect (Effects -> Video Effects -> Transform -> Crop) on both tracks with the black video. Then it is enough to select “Top” parameter in the setting of this effect and on the 2nd track to set the “Bottom” parameter on 80%.
Using "Levels"
If we want to adjust brightness and contrast, it is not enough to use only the effect which enables this setting. It often happens that the clip becomes only grey without white and black colours. We use the effect called “Levels” (levels). This function enables us to make changes and make sure that the white stays white and black stays black at the same time. Details in lights and shades will stay. If we unroll this effect in the “Effect controls” and click “set up”, a dialog window with a bar graph (histogram) and setting appear. This graph shows us the whole scale of hues from white to black and tells us which hue is represented and in what amount.
Using "Color Balance"
The “Colour Balance” effect (Video Effects -> Adjust -> Colour Balance). It is used to make colour corrections in a clip. We can find settings for red, green and blue colour items of a clip in the parameters of this effect separately for three hue scales (light places, medium hues and shades). By ticking off the item “Preserve Luminosity” we say the program to prevent from changes of brightness in an image when changing a colour. This keeps the hues balanced.
Softening
Using “Gaussian Blur” effect (Video -> Blur & Sharpen -> Gaussian Blur) we can soften an image similarly as in soap operas. This setting can (but also does not have to) be desirable. It is better to create an identical copy of a track than to apply the effect on the track itself. Then we apply the effect on this new track and change the “Opacity” parameter as we need.
Further Image Improvements
There is also another way how to improve the look of an image. We copy a video from the track 1 to the track 2 so that these two parts overlap. We apply “Blend Mode” and “Soft Light” choice which we find in “Effect Control” as a standard effect “Opacity” onto the video in the track 2. Then we also can lower the transparency of this track by 70%.
Example
The source video to practise: utb
Sample
Questions
- Why and how do we change the workplace of the program before colour corrections?
- How is the “Display Mode” used?
- How can we balance white and black colours and what does it mean
- Which effects are used to balance colours?