
Creating Presentation of Photos
 Content of the lesson:
- Import of Photos
- Creation of the Zoom In and Out Effects
- Creation of the Motion Effects
- Adding Transitions
- Exporting the Final Composition
Target of the Lesson
We will create a video presentation from photos in this lesson. It will not be a common photo slideshow because we will add the zoom in and out effects as well as motion effects to create a dynamic presentation. The procedure is not difficult, we have to use key frames to get a mild and smooth effect which will add dynamics to the photos. The final video can be seen below this text.
Import of Photos
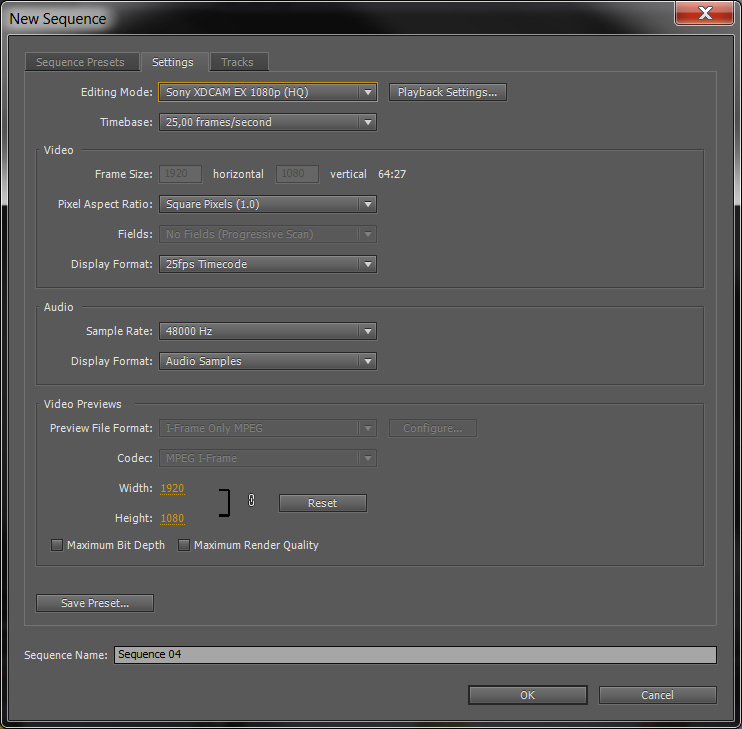
Download this archive (11,8 MB) which contains 9 source photos converted into the resolution 1920x1080 (FullHD). Open Premiere, create a new sequence and set the resolution to 1920x1080 because of the source photos (of course the photos were cropped because no camera takes photos into this aspect ratio).
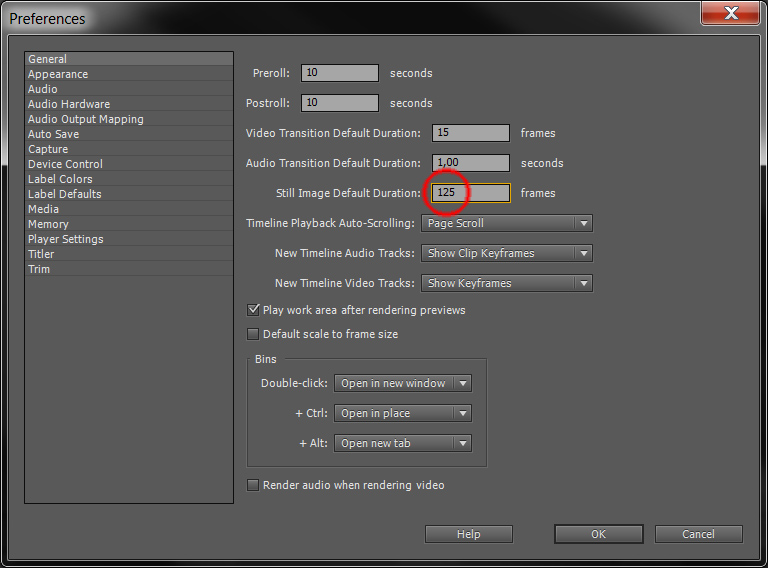
We will start with setting the default length of photos inside the program to prevent setting it manually for each photo. Open the menu Edit>Preferences>General and you can see the length inside the window - the value is in frames. We want to set the time to 5 seconds which means 125 frames if you have set the FPS value correctly while creating the new composition.
Now we can import photos by dragging them into the program window.
Creation of the Zoom In and Out Effects
We will add the zoom in and out effects at first, you can choose from these two according to the photos. Ideally you should balance them.
Drag the photo onto the timeline and place it at the beginning (we used the photo of autumn forest with name autumnzlin-17.jpg in the sample). The effect is not difficult, switch into the Effects window (the imported photo on the timeline has to be selected) and click on the stopwatch next to the item Scale.
We will create a keyframe inside the Effects window at the position 0 seconds - set the scale to 100 %. Then move the cursor to the position 5 seconds, click on the point between arrows next to the item Scale to add a new keyframe and set the scale to 125 %. The enlargement is only small so the effect is not rapid. We will use these values for all of the remaining photos.
The whole procedure is illustrated in the following video. You can see, that it is easy:
The zoom out effect is almost identical, you only have to set the first value to 125 % and the second one to 100 %. The second effect is suitable for example for the photo DSC_0028.jpg.
Creation of the Motion Effects
This is more difficult pare when we will try to zoom to another point than to the center - we can use this especially for the photos of animals because it is better to zoom to their heads than to the center.
The movement can be created by keyframes again but you have to think about the direction of the movement. We will use movements to all 4 sides (diagonally), each time by 100 pixels diagonally. These procedures are explained separately:
- Zooming to the right bottom corner you have to move the photo to the left and to the top (x-100, y-100)
- Zooming to the left bottom corner you have to move the photo to the left and to the bottom (x-100, y+100)
- Zooming to the right upper corner you have to move the photo to the right and to the top (x+100, y-100)
- Zooming to the left upper corner you have to move the photo to the right and to the bottom (x+100, y+100)
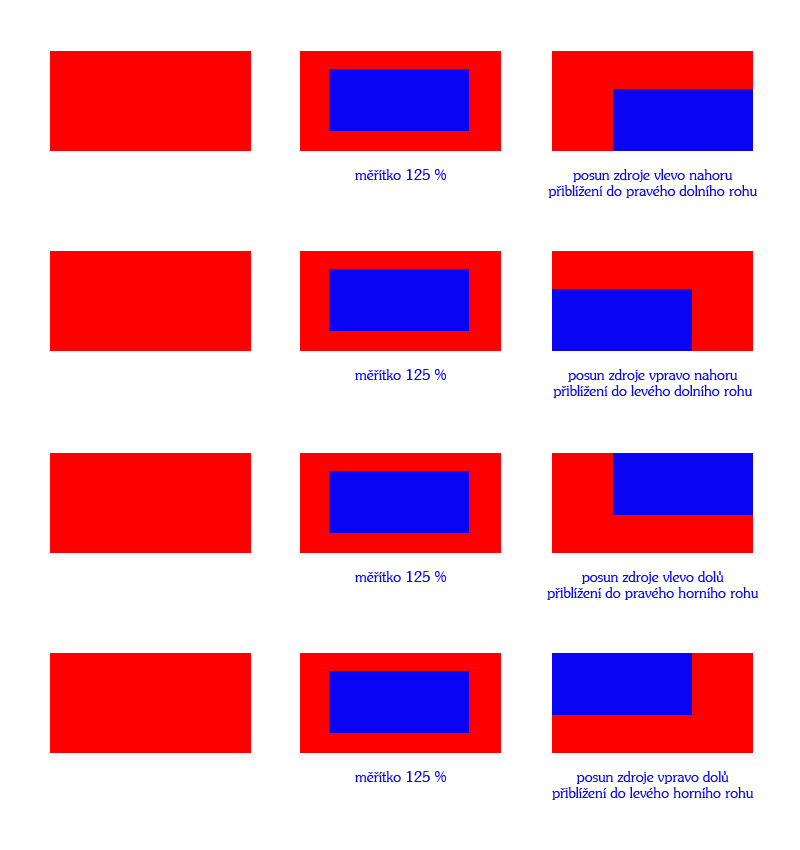
The visible area is blue, the source area is red.
You can see from the image that we have to move the photo to the other side than where you want to zoom in (out). We can try to add a zooming into the right bottom corner for the first photo with the autumn forest.
Click on the stopwatch next to the item Position and change the values at position 5 seconds by 100 pixels to the left and to the top (subtract them). Keep an eye to select the correct photo which you want to change! If you play the sequence you can see that the photo nicely zooms into the right bottom corner which adds an interesting idea to the video.
You can add zooming into the other corners using the same procedure, you only have to pay attention to the direction - you can use the previous image for better orientation and then change the values by 100 pixels in the right direction. Several photos do not require to add motion (if the main object is in the center) so we will not add the motion to them.
In this sample we use 9 photos to create the video which is not a problem but imagine a situation when you wanted to use 100 photos. Would you like to adjust them separately? You can use a simple procedure for this purpose, you only have to click on the source photo using the right mouse button, choose the command Copy, then click on another photo and choose the command Paste attributes. Of course you can select more photos at once and paste the attributes to all of them. Using this procedure all keyframes are duplicated so the other photo is also adjusted.
Create one source effect and then copy it to the other images for which you want to use the same effect.
Adding Transitions
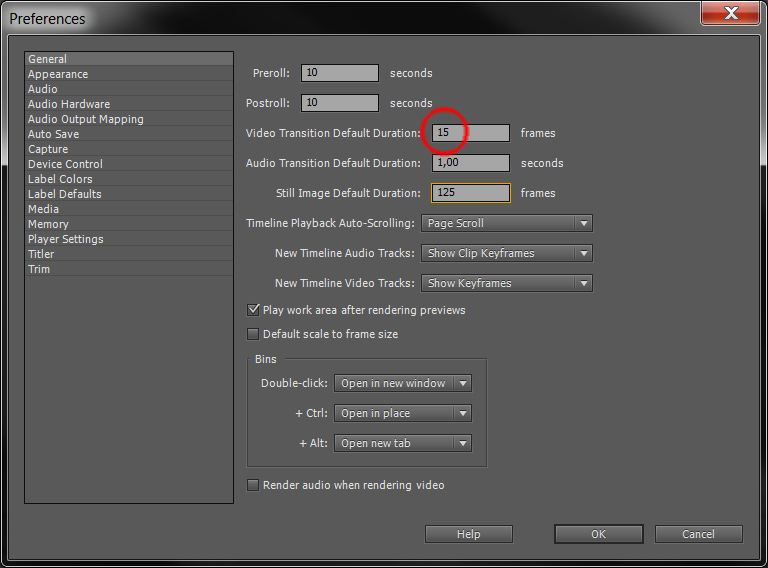
At the end we can add a slight blending between the images to make the transitions smoother. Open the window with general preferences and change the values of video transition duration to a suitable value, for example 15 images - we do not want to adjust each transition separately.
We can add for example the Cross Dissolve transition between all photos to make the transitions smoother. At the end of the sequence we can add the Dip to Black filter to end the video with a nice fadeout to black.
Exporting the Final Composition
The video is finished, we have to select the sequence by clicking on its name above the timeline and then select the command from menu File>Export>Media... (Ctrl+M) where you can choose from the presets or you can set values manually. Anyway you have to set the resolution to 1920x1080 pixels, the FPS value to 25 and not too low value of bitrate to keep the video nice.
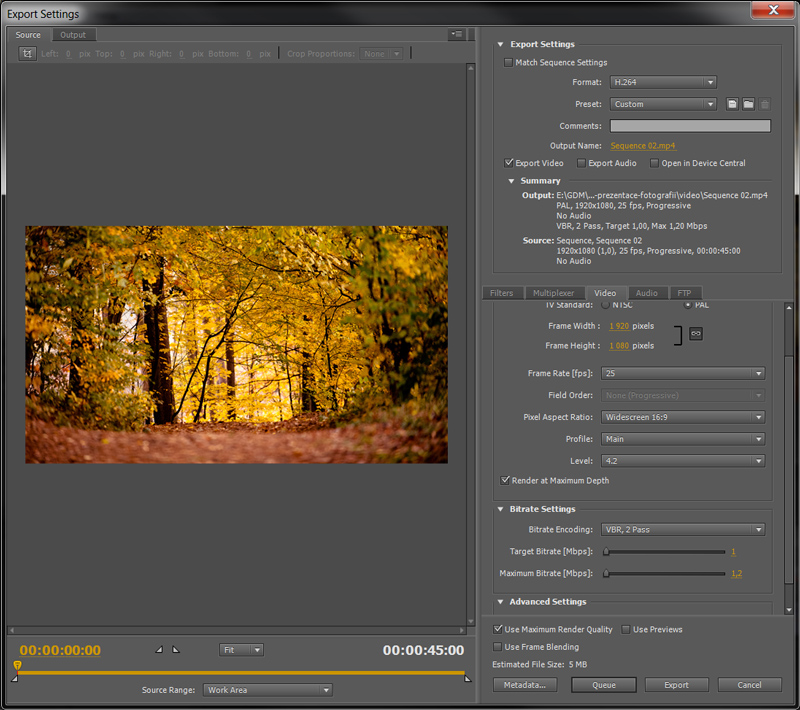
You can export the video directly using the Export button or you can Queue it to Adobe Media Encoder. If you use multi-core processors or larger RAM modules, you should use the Queue option because Adobe Media Encoder uses these resources more effectively. You can also prepare several exports and launch them at once later to prevent slowing your work down. You should not forget to launch the encoding process manually inside the Adobe Media Encoder window, otherwise the export will not be done (program pauses it automatically).
Questions
- How can you create the effect of zooming into a point in the photo?
- How can you set the default length of imported photos?
- How can you set the default length of video transitions?
- How can you quickly export video?