
Video & Audio Effects, Working With Video & Audio Effects
 Content of the lesson:
- Video & Audio Effects
- Effects and Key Shots
- How to Adjust Brightness, Contrast and Colours
- How to Change a Colour
- How to Remove Noise from a Shot Video
- How to Censor
Video & Audio Effects
A source video to practise: halloween
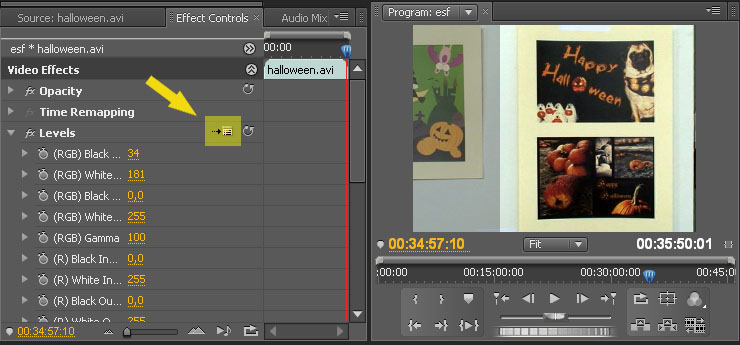
Using effects we extend the basic offer of an “Effects Controls” toolbar. After adding some effect, the effect is displayed on the given toolbar. There we can specify its setting according to our further ideas in most cases. In case it does not have any further settings, we can deactivate it by pressing the key (fx) and we do not have to remove it.
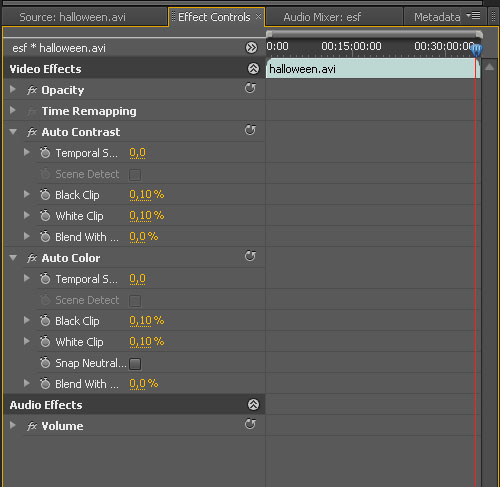
Effects controls toolbar
Effects Application
Effects application is the same as the one in transitional effects. At first we unroll the list of effects (this list is in the “Effects” toolbar) and there we choose the required effect from the effects offer; this means we choose e.g. “Video Effects” and then the set of effects “Adjust”. Then we choose the “Auto Contrast” effect click on it (keep the press key pressed) and by dragging it onto the timeline, we place it into required video blocks (release the press key). The effect is applied on the block of a video after dragging it and then we can have a look at the “Effect Controls” on its setting.
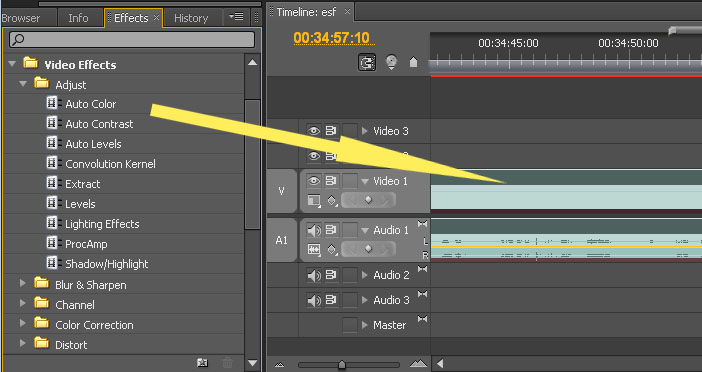
Effects application
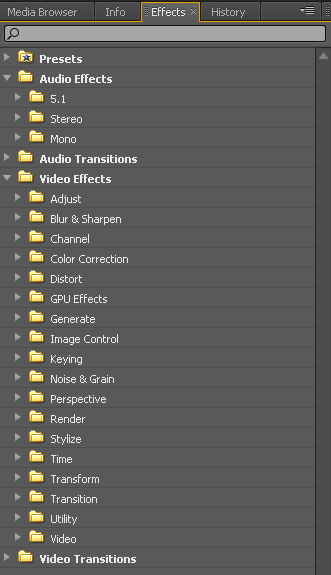
Effects toolbar
Effects and Key Frames
Using key frames for effects is the same as in the chapter about animations. Effects do not have to be set (either automatically or manually) on a needed value of their parameters after their application during the whole time duration of a video. We can change this setting in time with key frames; this means that the effect changes its values according to the situation.
How to Adjust Brightness, Contrast and Colours
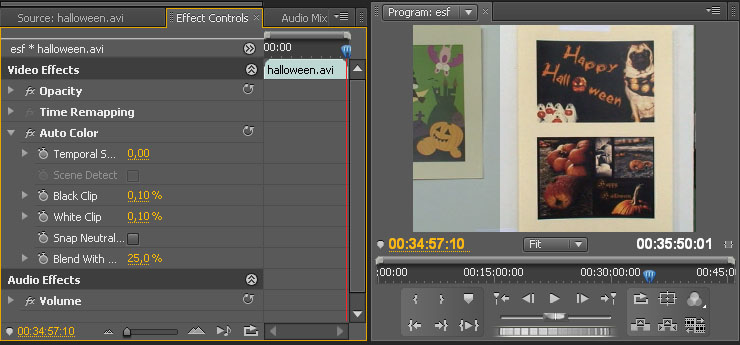
Adjustment of brightness, contrast and colours belongs to the most essential adjustments of a shot video. We need to adjust a shot video the same way as we adjust taken photos in a computer to get the best and most real image. The difference is that we do not work with only one picture but with several pictures per second during a given total time. If we have a look at the picture below, we can see that it is adjusted in its left part and it is not in the right one. The picture is darker in the right part and it is full of grey colour. To get a better picture, we will try some of the simplest effects that are destined for this purpose.
Colour adjustment is discussed in detail in the chapter “Colour corrections, film appearance”.
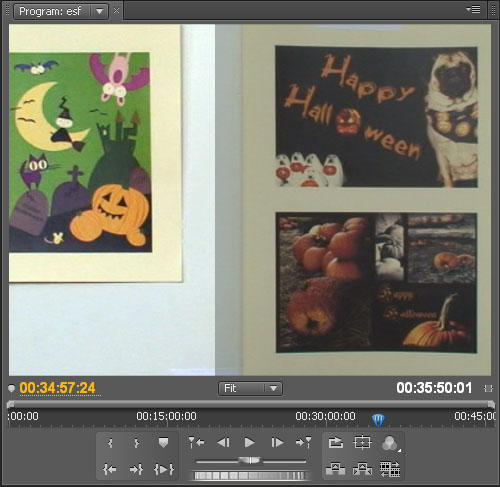
Sample of a video adjustment using effects
Possibilities of Brightness, Contrast and Colour Adjustment
- • Automatic effects - they are the fastest way to adjust a video. These effects are found in “Effects” toolbar, “Video Effects -> Adjust” item. Effects for setting and adjustment of a video are found in this unit.
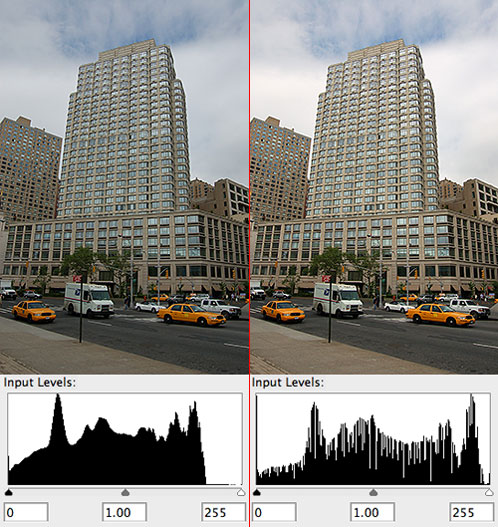
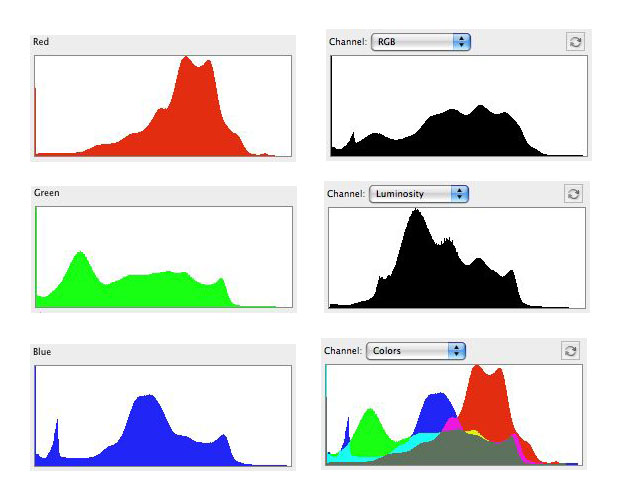
- Auto Contrast - Auto contrast – if we want to know some information about a video, an image if you like, which we are looking at, we will certainly be interested in the histogram. It is a graph that informs us about a frequency of shades (brightness) in the picture. Histogram tells us the distribution of shades in the image. When we use an automatic contrast program, it checks histogram, its individual units (e.g. RGB), finds the darkest and lightest colour and adjusts the values so that the final histogram of all units fills the whole area. The histogram is expanded – the darkest blue is found and is expanded up to the end of an area. The other units (green and red) are expanded at the same time. The same is done on the other end of an area. A colour in the red area is found and is expanded up to the end of an area the two remaining units are expanded by the same distance. By doing this we keep the final colour of a picture, it does not change. The result of this effect is that the contrast of a video is increased and greyness is removed. E.g. a dusky white colour changes into the most possible white and a dusky black colour into the most possible black.
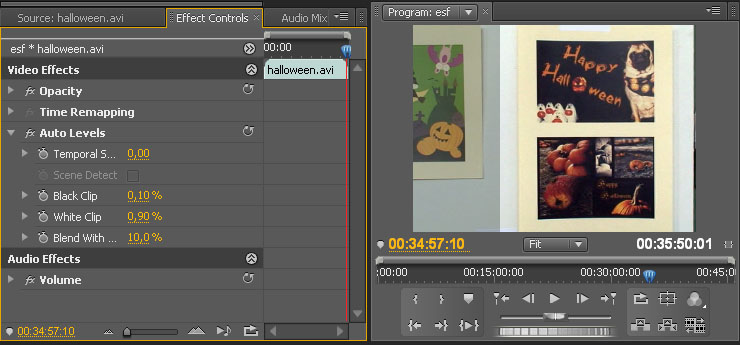
- Auto Levels - this effect is very similar to the Auto contrast one. The program again trace information about a video and sets values so as there are no empty spaces in the graph and the histogram occupies the whole area. The difference is that this setting is done for each colour component separately. Each single colour component is set so as it fills the whole area; this means red, green and blue components are set separately. Histograms are extended at different values. This time the darkest and lightest places are changed as follows. The darkest spot is found (no matter which colour) and is set as black colour; the lightest spot (again no matter which colour) is set as white colour. By doing this dusky places are removed and colours of a video are corrected.
- Auto Color - this option should offer more reliable results than Auto contrast and Auto levels. This effect sets contrast and colours at the same time but in a different way. It does not search for shades, middle shades (notes) and lights in the histogram channel but directly in the real picture.
- Brightness and contrast - this effect just works with a histogram. It is done for all components (e.g. RGB) at the same time. During the effect application and its setting display we can change brightness and contrast. And what happens with a picture? If we change brightness, the histogram moves to one or the other side, it means we move frequency of concrete brightness components nearer towards black or lighter places. This also changes the frames of a video. Contrast, on the other hand, expands or reduces histogram; it means that either we compress frequency towards one place or we expand it further from each other and by doing this we fill up the area of the whole graph.
- Levels - we have already mentioned levels when speaking about automatic levels. Have a look now how this effect can be used and how to set it manually. In the picture we can see that there is a possibility to set separate components numerically. Another possibility is to click the “Setting” at this effect.

Effects application
zHistogram changes after an effect application
source: www.dpreview.com
Effects application
Automatic levels application
source: www.photographysavvy.com
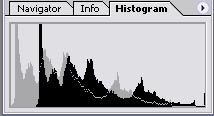
Histogram example
source: www.davidfenwick.co.uk
Effects application
A histogram shift by changing brightness
source: www.outthereimages.com
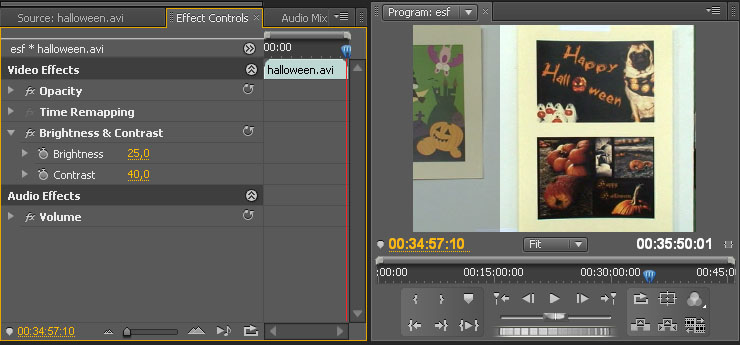
An example of brightness and contrast setting
Effects application
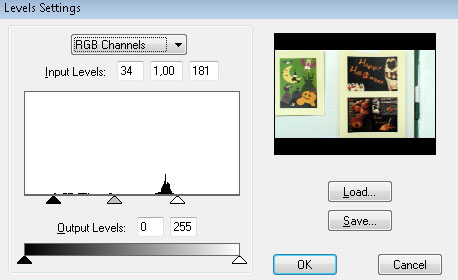
Settings...
When you click this button, a dialog box appears where we can set the extent of a histogram by using sliding stops or numerically either for all components together (picture contrast is adjusted this way) or for each component separately (this changes colour features as well).
Effects application
How to Change Color of Video?
A source video to practise: zmena-barvy
Sample
Procedure
To change a colour in the required video there are two simple effects.
- Change Color - this effect with appropriate options appears in “Effect Controls” after adding it. The Colour to Change component is the most important for us there. There we can set the colour we want to change. We can do it by clicking the square with the chosen colour and set the colour manually. But using the eyedropper which is just next to the square is more effective. Then we just get back to the video, choose the appropriate colour and confirm it. And now let`s try to change the Hue Transform component. This leads to a change of the chosen colour and we can also set e.g. the depth of the chosen colour and the tolerance that limits the volume in which the chosen colour changes there. It is good to switch over into mask that displays included places as white and the others as black.
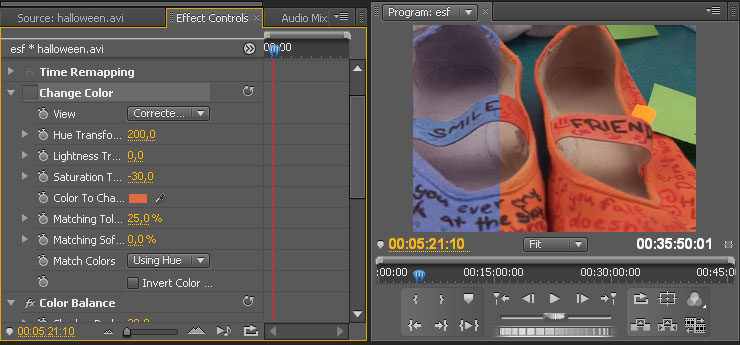
Change colour effect application
- Change to Color - the other effect is very similar to the first one. The only difference is that we do not choose only the colour we want to change but also the colour into which we want to change. There are also other possibilities of setting such as tolerance and softness of an effect. Switching into a mask is also illustrated.
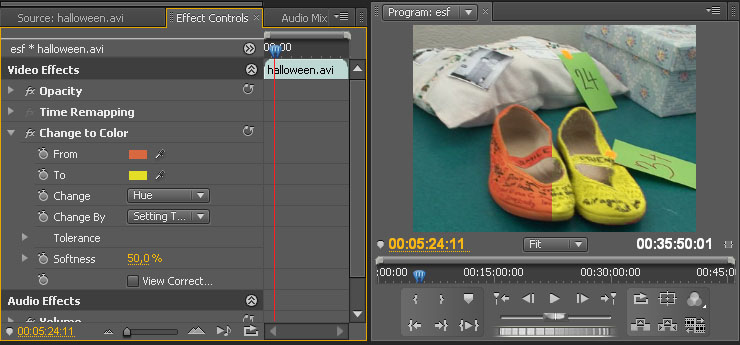
Change to Colour effect application
How to Remove Noise from a Video
Source video to practise: audio-efekty
Sample
Procedure
To remove the noise from the background we can use DeNoiser effect which we can add into an audio track. We can see in “Effect Controls” after clicking this audio track.
- Bílá linka - Audio spectrum.
- Žlutá linka - Noise floor (Bottom border of the noise).
- Zelená linka - Offset setting.
- Noise floor - Bottom border of the noise is in decibels and is resized during replaying a video.
- Freeze - This setting “freezes” Noise floor setting on a certain value. It is good to click off this option if the noise changes all the time or is varies. We let the video replay for a short time and when the value gets settled we click it off.
- Reduction - This is a reduction of noise in decibels.
- Offset - Balancing, a possibility to set adding or taking off an automatically set value. It enables us to put the setting more exactly if it is not possible automatically.
The introduced demonstration was created using settings in the following image.
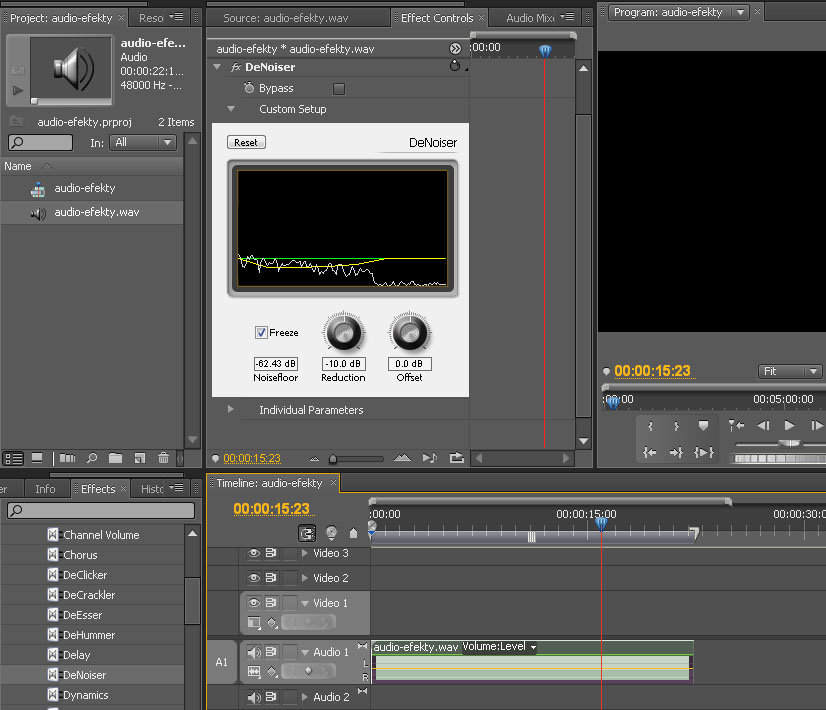
Effects application
How to Censor?
A source video to practise: cenzura
Sample
Procedure
To get this effect we need another two effects; Crop and Mosaic. But it is not all. To use this effect we have to double the video in the first track into the second track. Then we apply these affects onto the second track.
- Crop - this effect trims a video
- Mosaic - creating a mosaic from a video onto which we apply the effect.
Our task is to create a cubed picture in the place where there is a name of cigarettes on their box. We work with the video in the second track. There we apply the Mosaic effect at this time and set the values according the picture bellow. Now we get cubes from the picture on the whole area of a video we can see. To get the cubes only in a certain place, we trim the video by the Crop effect. We do not mind setting of the picture this time because this setting changes over time, so the key frames are used. At first we set the video so that the box of cigarettes is in the middle of the shot. Then we set the Crop effect values so that the checks are only in the place of the label. We can do this either by entering numerical values or, more quickly, by clicking the effect on the toolbar. Trimming a video appears there and we can see its borders. If we put the mouse on this border and click the line or points, we can move these lines if we have the left button pressed. Numerical values in the setting the effect toolbar are changed at the same time. Now we try to set the effect so that it always covers the sign even when the shot changes. Therefore we need to activate key frames it means to switch on the alarm icon by all the four Crop effect values (Left, Top, Right, Bottom). Now if we move the video backwards or forward, we can move the trimming according to what we need – to cover the label every time. The whole trimmed picture can be taken by clicking the left mouse button (keep it pressed) on the centre of this trimmed picture and then moved onto the required place. Then it can be set according to the length of the sides. Now we can try to go through the whole video and get the label always cubed.

Effects application
Questions
- Where the effects can be found and how are they applied on a video?
- What is the fastest way of adjusting brightness, contrast and colour of a video?
- What happens with a video when Brightness & Contrast effects are applied?
- How the colour of a video can be changed?
- How can the noise from a video be removed?
- Explain the procedure of censoring a video.