
CSS Layout of a WWW Page (Boxes and the Deployment)
 Content
of the lesson:
Content
of the lesson:
- Layout - Placing the Elements of the Page
- File Structure of Our Website
- The Main Container of the Page
- The Banner Element
- The Menu Element
- The Content Element
- The Footer Element
Layout - Placing the Elements of the Page
In this lesson we are going to define a set of CSS rules, which make the basic layout (deployment of elements) of our page. We are going to use html tag div, which can be used to define block elements for basic elements of the page (you can find many types of CSS layouts on the websites http://layouts.ironmyers.com/ and http://blog.html.it/layoutgala/).
We are going to create one of the most used layouts, which contain a header (banner), a left menu, a place for content next to the menu and footer.
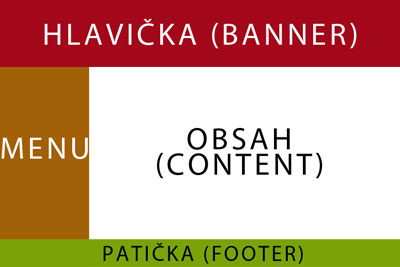
Think about the dimensions of the elements in pixels.
- The total width of the page - which width should we choose? We have to consider which width is optimal for majority of users because of their display resolution. How can we find out which resolution should we respect to cover majority of users? We can try to find some kind of statistics. This statistic can be found for example on website http://www.w3schools.com/browsers/browsers_display.asp. From the January 2009 results we see that a resolution 1024x768 pixels is still used apx. by 36 % of users and higher resolution is used apx. by 57 % of users. If we create a page which will fit into 1024 pixels wide display, we will cover at least 93 % of users - these users will see the page without any problem. However, we cannot set the width of the page to 1024 pixels because of the borders of any browser and also because of the vertical sidebar. The maximum value is 900 pixels.
- The height of the page - the height is usually variable and can be set to any value or can be left unset.
- The height of the banner (header) - we usually place graphics into the banner and this graphics should characterize the website. We have to think about the height of the banner. We can consider any value, but usually values between 150 and 250 pixels are used.
- The left menu - the height could be variable because we do not know the number of items in the menu. The width should be enough to fit every item's text (description). We can consider values between 150 and 200 pixels.
- The content of the page - it fills the place between the left menu and the right border of the page (width of the page - width of the menu = width of the content). If we set the width of the page to 900 pixels and the width of the left menu to 200 pixels, the width of the content will be 700 pixels.
- The footer of the page - the width will be the same as the width of the page (900 pixels), the height could be set as we need.
File Structure of our Website
At first we create an empty html page with header only (html header, not our header box) and we save it to a directory as index.html. We create a subdirectory css in the same directory and we place a new file styly.css into it.
The creation of the file with CSS styles
We will open Adobe Dreamweaver (in case we do not have this software, we can use any text editor like pspad) and create a new empty css file using UTF-8 encoding (File > New) as illustrated in the following image.
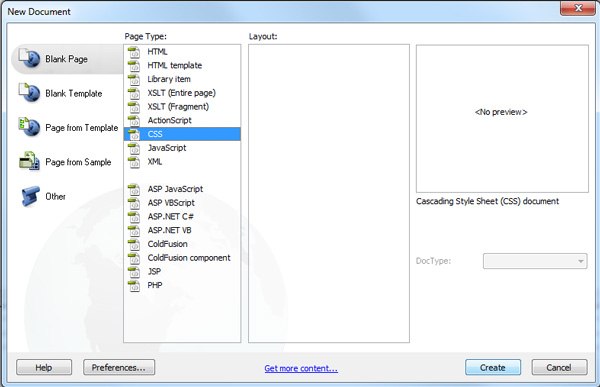
There are only 2 lines of code in the newly created css file. The first one is information about the encoding and the second one is a comment which informs us that this is a CSS document.
@charset "utf-8";
/* CSS Document */
We save the file styly.css into our css folder. The next step is the creation of the new file index.html as a new empty html document. We choose File > New in Adobe Dreamweaver. In the following window we assign the css file (in the right bottom border of the window, illustrated in the following image).

<!DOCTYPE html PUBLIC "-//W3C//DTD XHTML 1.0 Transitional//EN"
"http://www.w3.org/TR/xhtml1/DTD/xhtml1-transitional.dtd">
<html xmlns="http://www.w3.org/1999/xhtml">
<head>
<meta http-equiv="Content-Type" content="text/html; charset=utf-8" />
<title>Untitled Document</title>
<link href="file:///C|/wamp/www/web/css/styly.css" rel="stylesheet" type="text/css" />
</head>

<body>
</body>
</html>
The first line informs the browser about the type of tagging in the document, the attribut meta informs the browser about the encoding. UTF-8 is commonly used because of its full compatibility with almost every language.
We can see that the inserted link to css file contains an absolute path to the file under our system. The path will change to relative in a moment when we save our file in the root directory of our web (File > Save). The header will then appear like this:
<!DOCTYPE html PUBLIC "-//W3C//DTD XHTML 1.0 Transitional//EN"
"http://www.w3.org/TR/xhtml1/DTD/xhtml1-transitional.dtd">
<html xmlns="http://www.w3.org/1999/xhtml">
<head>
<meta http-equiv="Content-Type" content="text/html; charset=utf-8" />
<title>Untitled Document</title>
<link href="css/styly.css" rel="stylesheet" type="text/css" />
</head>
<body>

</body>
</html>
We should never use absolute paths because such a web is not movable as a complex to another computer or to another directory. We have done everything which is needed to start creating our new page.
The Main Container of the Page
For creating elements of the page we are going to use the html tag div. We can imagine the div element as a panel, where we can insert images, text and much more. We are going to assign an identifier (id) to every element and write a css rule (create styles for it) which will describe the appearance of the div with this identifier.
As first we are going to create div identified as box, which will contain the whole page.
<body>
<div id="box">

</div>
</body>
We have created element div with id box, this id (name) is unique and cannot be repeated in the whole page. There cannot be two elements with the same id in one page.
div#box{
    width:900px;
    margin:auto;
    background-color:#8cd5f0;
}
Because we have identified the div (we have given an id to it), we can apply styles which will be applied only for this div. The styles are written into css file. The command starts with the type of the element, then the char # and ends with id of the element. The list of styles for the element is written into braces and the commands are separated by semicolons.
At first we set the width to 900 pixels (the width could be set straight in pixels or in percent). Then we can see that spaces and empty lines are ignored so make the file well-arranged as you wish.
The second rule is defining the left and the right indentation. Margin always sets indentation from one side, you can use separately margin-left, margin-right, margin-top and margin-bottom for setting every indentation, or you can use margin to set all 4 indentations at once. The value auto tells the browser to compute the width of the parent element and align this element to its horizontal center. To function properly you have to set the width of the element which is being centered.
The last rule sets the background color of this element. The colors can be set using hexadecimal RGB format (we could get this format for example from Adobe Photoshop) of we can use one of the predefined colors as black, white, red etc. (predefined are only the basic colors).
The Banner Element
The element box from the previous part creates the panel for placing the whole page. Now we are going to divide this panel into header, menu, content and footer. We are going to add more divs, beginning with header. We create new div banner and place it inside the div box. Do not forget to assign it a unique id - banner.
<body>
<div id="box">
  <div id="banner"></div>
</div>
</body>
We can continue by applying some css styles on this div.
div#banner{
    width:900px;
    height:250px;
    background-image:url(../obrazky/banner.jpg);
    background-position: top center;
    background-repeat: no-repeat;
}
We set the width to 900 pixels again to let the banner take the whole upper part of the page. We also set the height for this div - when creating a real website we would adjust the height according to the height of the banner image or animation. The third command is adding a background image which is done with the command background-image: url(). There are no quotation marks in the brackets, but in Adobe Dreamweaver we can select our image file and the path is completed automatically. If we are surprised with the ../ part of the path we should know that this means one directory up so it is possible to write all links relatively. A website with relative links could be easily moved to another hosting or directory.
The commands background-position (the position of the background is set to horizontal center and vertical top) and background-repeat (it is set not to repeat the background image, but you can use values like x-repeat for horizontal repeating and y-repeat for vertical repeating) are not compulsory but you can avoid wrong layout in case that the banner would have different dimensions than the banner div.
The Menu Element
We are going to continue similarly with div menu. Add a unique id to this div and insert it inside box div, right after banner div to let the menu be drawn below the banner.
<body>
<div id="box">
  <div id="banner"></div>
  <div id="menu">
  </div>
</div>
</body>
div#menu{
    width:200px;
    float: left;
}
The width of menu is 200 pixels. In case we want the menu to be drawn, we have to add some text inside; otherwise we will not see it because we did not set a fixed width for it.
The command float: left is essential for placing two divs horizontally one next to another one. Using this command we can achieve a situation when this and every next element will be pushed upwards and to the left after previous elements. For menu, this means that it will be placed in the top left corner and the next content div will be placed in the top right corner. Without using float command it would not be possible to place two divs horizontally one next to another one. The content would be placed under the menu.
The Content Element
We are going to place another div next to the menu - the content. The div should be placed right after menu and should have its unique id.
<body>
<div id="box">
 <div id="banner"></div>
 <div id="menu">
 </div>
 <div id="content"> Tady bude obsah webu. </div>
</div>
</body>
div#content{
    width:700px;
    float: right;
}
We set the width to 700 pixels so the content together with the menu take 900 pixels which is the width of the box. If we set a higher value, the content will move under the menu because it will not fit. Otherwise if we set a lower value, there will be empty space between them.
In this case we use the command float: right which makes exactly the same as float: left but it pushes this and every next element upwards and to the right. For the content this means that it will be placed between the menu and the right border of the box instead of being placed below the menu div.
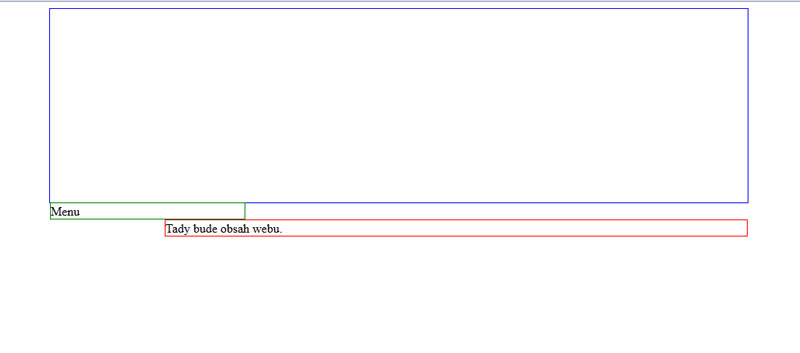
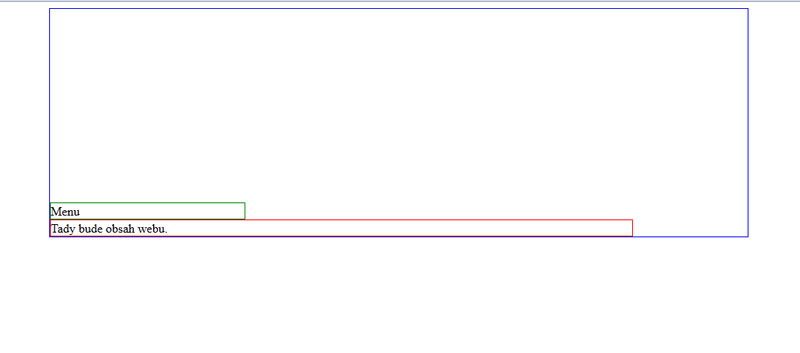
You can see the layout in the previous image (borders are added to all divs). You see that the menu div has zero height because there is no content inside. If you set the width of menu and content together bigger than the width of box, the following problem will occur:
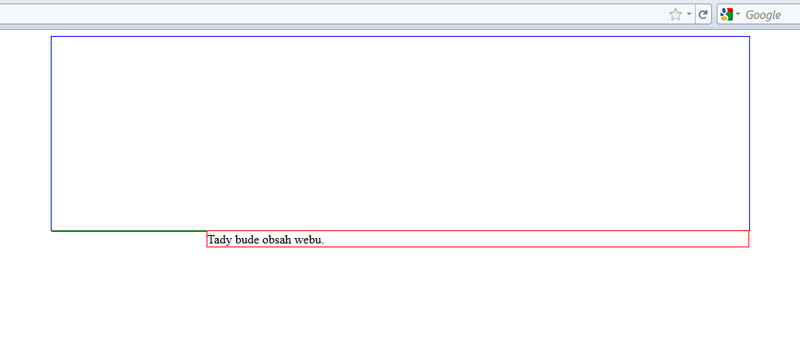
The following image illustrates a situation when float command was not used:
The Footer Element
The last div we are going to add is the footer. We insert it straight behind the content and assign it its unique id.
<body>
<div id="box">
 <div id="banner">Banner webu. </div>
 <div id="menu">
 </div>
 <div id="content"> Tady bude obsah webu. </div>
 <div id="footer"> Patička webu. </div>
</div>
</body>
div#footer{
    width:900px;
    clear: both;
}
We set the width to 900 pixels to fill the whole width of the page. Because it is not required for any following elements to be pushed to the left or to the right by the float function, we terminate it with the command clear: both. This command has also one advantage - it takes the higher div from menu and content (according to their contents) and adjusts the height of the second one to this value so we get the final page which has no gaps.
Nothing more is needed to add, we have completed the basic scheme for our page.
Additional Texts
Questions
- Which html tag should we use for creating parts of the layout?
- Describe the box model in CSS.
- What should a div fulfill to be visible in page? Consider more options.
- How does the CSS property float behave?