
Creating Banner and Placing It into Website
The term "banner" means a static rectangle graphic element which creates the upper part of a website.
 Content of the lesson:
- Banner Samples
- Banner Parameters
- Creating Banner in Adobe Photoshop
Banner (Header of WWW Page)
Short information about banner:
- Together with navigation it is the most important element of a page
- It identifies the page
- It informs a visitor shortly
- It gives us the basic idea about the page
- It should be interesting
Banner Samples
Take a look at several banners which can figure as a part of a website design. The samples represent banners for different topics. You can see a list of key elements next to each banner and also a short description how the banner was created.
Banner 1
This banner creates a simple informative header of a page aimed to software and graphic development (the portal www.gjszlin.cz). The whole banner is filled with grey color and a text with an image is added. The @ sign and the image are filled with green color and has the Inner Shadow effect applied.

The procedure in Adobe Photoshop:
- Create a new file 900x117 pixels.
- Fill it with grey color (using the Paint Bucket tool).
- Write the text using the Text tool and a suitable font and color.
- Enlarge the @ sign (select it in text, enlarge it and move it).
- Apply the Inner Glow style for the at sign (layer styles).
- Insert the image and apply the same style as you did with the @ sign.
Banner 2
This orange banner creates a header for an educational page Cabri Geometry II plus. The banner contains the logo of Cabri Geometry II plus software and information about the fact that this methodic software is prepared for teachers. The other elements are abstract only.

The procedure in Adobe Photoshop:
- Create a new document 970x120 pixels.
- Fill the background using a color gradient (Gradient tool).
- Create a new layer with rectangle using an orange color (you should take the color using the Eyedropper tool from the logo) and apply a layer style to create the dark lines around the rectangle - Stroke).
- Write the text "METODIKA PRO UČITELE" using a suitable font and color.
- Insert the logo of the program and adjust its size (Transform tool).
- Add additional stripes above the program logo (new layers, Selection tool and Paint Bucket tool).
Banner 3
A banner of student newspapers Renomé contains the logo (headline Renomé) and information about the content of the website. You can also see a person reading newspapers.

The procedure in Adobe Photoshop:
- Create a new document 850x140 pixels.
- Fill the background with black color.
- Insert the photo of the person reading newspapers and adjust its location and size.
- Insert the logo image, adjust its size and location and apply a layer style to create the shadow (Inner Glow).
- Write the text "Studentské noviny" using a suitable font.
Banner 4
Banner aimed to sport topic and contains three photos (with a border around), SPORT headline and an informative text "Galerie nejlepších". The SPORT headline has a special O char - created from a stopwatch to highlight the topic of the website. There is a transparent strip in the middle of the banner (it improves the readability of texts).

The procedure in Adobe Photoshop:
- Create a new document 900x169 pixels.
- Fill the background with black color.
- Insert three photos, adjust their size and location, crop the unwanted parts (using rectangular selection and delete key) and apply the Stroke style to get a white border.
- Insert the image of stopwatch, adjust its size and location and apply Stroke style to get a white border.
- Write the texts "SPORT" and "GALERIE NEJLEPŠÍCH" using a suitable font and color.
- Create a new layer, fill it using a rectangle with yellow color and lower the Opacity value as you want.
Banner 5
Photos connected to the topic of a website are often used. You can see a banner from the web of Charles Burton who specializes in conditional trainings. The photo is a snapshot from one of his lessons and illustrates the training atmosphere and his temperament.
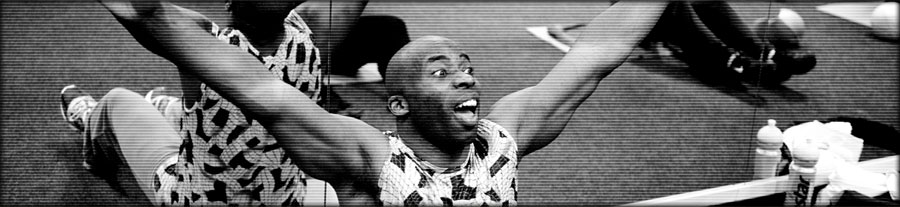
The procedure in Adobe Photoshop:
- Create a new document 900x207 pixels.
- Insert the photo and adjust size and location.
- Apply the Inner Glow style to create the inner shadow.
- Apply the "scan-line effect" which you can find using the "horizontal lines Photoshop" string in Google (see http://creativebits.org/photoshop/scan_line_effect_in_photoshop for Adobe Photoshop or http://www.entheosweb.com/fireworks/scanned_line_image.asp for Adobe Fireworks).
Banner 6
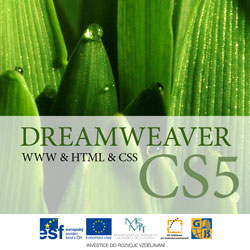
A universal image is also being used for presentations. The following banner uses a company logo and a universal background image (a photo of a leaf after rain). The white transparent rectangle is used to improve the readability.

The procedure in Adobe Photoshop:
- Create a new document 805x200 pixels.
- Insert the photo, adjust its size and location and saturate or sharpen it.
- Create the upper rectangle with a gradient and the text "Human Resource Management".
- Create a rectangular selection in a new layer and fill it with white color + set a suitable Opacity value.
- Insert the logo of the company (adjust size and location).
Banner 7
The graphic banner element was merged with the background of the website in this case but you should consider the width (a user with a higher resolution display would see the background on the left and right side of the banner).

The procedure in Adobe Photoshop:
- Create a new document 1900x330 pixels.
- Create the upper gradient.
- Insert the logo, adjust its size and location and apply the Outer Glow style.
- Add the additional image of fluff to express softness.
Banner 8
This banner of a fictive wedding studio is higher than the others but is not a problem if you want to tell the visitor an important information from your banner. You can use higher banners on websites which should visually interest your visitors. The content of these websites is usually only a contact, short description and a gallery.
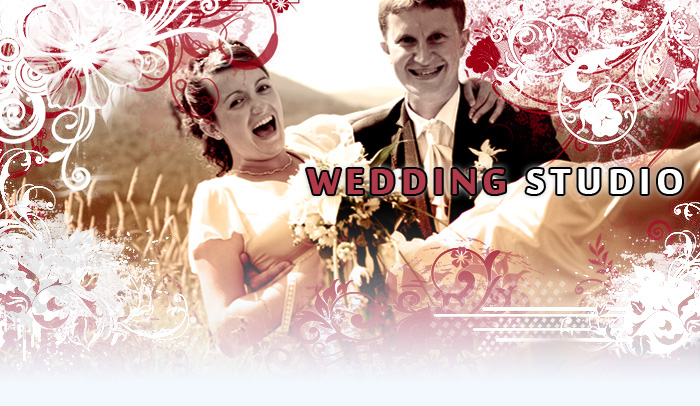
The procedure in Adobe Photoshop:
- Create a new document 700x406 pixels.
- Insert the photo to the background.
- Ornaments are created using the Brush tool in Adobe Photoshop (you can download more collections from the internet).
- Add the headline "Wedding studio" and apply the Stroke and the Outer Glow styles
- The bottom image fades out - you can achieve this effect using the Mask and the Gradient tool.
Individual Task 1
Try to characterize main properties of a banner. Answer the following questions:
- What is the main purpose of a banner?
- What are the best dimensions for a banner?
- Which image format is the best one to use?
- Which Adobe Photoshop tools would you use? Show several examples using these tools.
Individual Task 2
Try to complete these tasks using Adobe Photoshop - you can use the online help inside the program:
- Create an image - using dimensions of 800x200 pixels (resolution 72) and insert a photo from a web page.
- Text tool - insert a text (a row or a paragraph), change the font size, color, spacing or line height.
- Gradient tool - create a gradient from two colors and try to set them using the Eyedropper tool.
- Transformation tool - examine this tool (change the size of an image, rotate an image).
- Rectangular selection and Paint Bucket tool - examine selections (change its size, crop an image, fill a selection with a color).
- Layer styles - Inner Glow, Outer Glow, Stroke and more.
- Save Image for Web - the possibility to save an image to be used in a page (using any resolution and quality).
Homework
Try to create the following banner in Adobe Photoshop using this photo: plavkyne.jpg and try to find a suitable image of stopwatch in the online catalogue of Microsoft Office.

Questions
- Why should you add a banner to your website?
- What are the best dimensions of a banner and why?
- Which image format is the best one to use?
- Which Adobe Photoshop tools would you use? Show several examples using these tools.