
Portrait retouching and toning II (part 1)
 Content
of the lesson:
Content
of the lesson:
- RAW Photos Processing
- Skin Retouching
- Eyes Editing (magnification, removing mascara, pupil adjustment)
- Removal of Wrinkles and Imperfections
- The Liquify Tool
- Removing Hair from the Forehead
- Editing Teeth and Lips
- Hair Coloring and Recovery
- Editing Shoulders and Completing the Retouch
Why to Use a Retouch
Most of the photos are not perfect because of bad light conditions or imperfections of the photographed person. The common problems are wrinkles under the eyes or on the neck, hair on the forehead, fading shine in the eyes, chapped lips, not interesting color of hair, dirt on the skin, small eyebrow and many other. The subjective impression is very important when editing these problems. You should make your adjustments slowly and rather more times because they cannot be returned back later.
Step 1: RAW Photos Processing
Most digital cameras can save images to the classical JPG format as well as to the RAW format. This format is excellent because the camera makes almost no changes to the data and you can process it in the computer using more complex algorithms. Every camera producer has his own RAW format.
Adobe Photoshop is able to handle RAW data (you only have to update the Camera Raw database from Adobe server if your camera is not supported).
Open the file DSC_8132.NEF (13,5 MB) in Adobe Photoshop and you should see the following window where you can change exposure settings.
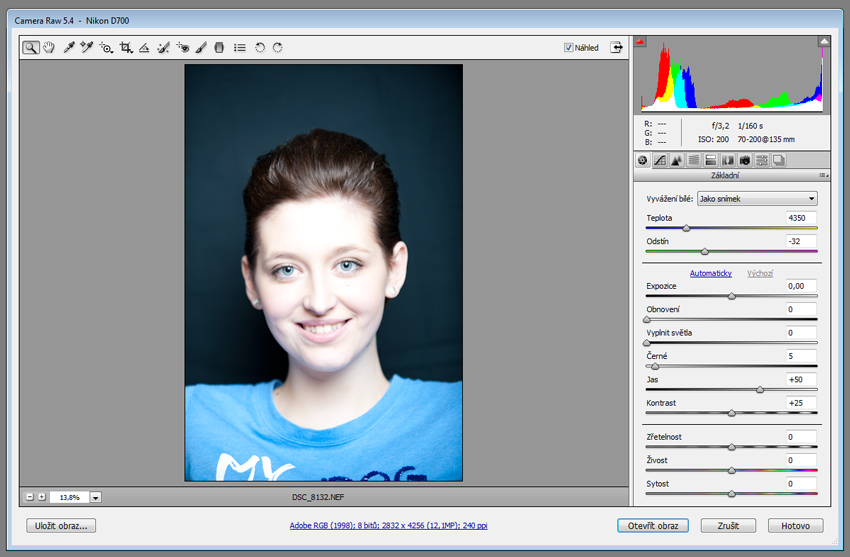
We are going to edit several parameters to improve the photo. The whole procedure is quite subjective and there are no optimal values - you have to experiment.
- Exposure - the exposure affects the
brightness of the photo. Lowering the value will make the photo
darker; raising the value will make the photo brighter.
Lower the value to -0,75 because the photo is slightly overexposed. - Recovery - this option tries to recover
details in white or black places - you can recover details in
places which were over- or underexposed.
Set the value to +30 to recover details in the face slightly. - Vibrance - this parameter saturates colors
but it affects only colors which are not saturated, the
saturated ones remain without changes.
Set the value to +30 to stress the colors in the face slightly.
If we are satisfied with the result press Open image button, the settings will be processed and a new document will be created.
Step 2: Skin Retouching
I strongly recommend you to duplicate every layer before editing it. You can then return back in case that anything goes wrong and you can also compare the previous and final state after making a change and consider if the change was successful. It is also a good idea to rename every layer to be able to identify the change which was made. Do not forget to save you file frequently to have a backup in case of system or power failure.
The first step is retouching the skin because most of the following changes (of eyes, hair etc.) will not be reversible. The term Retouching includes deleting pimples, ugly signs or another bad areas.
The best tool for this part is the Clone Stamp Tool. Set the Mode to Lighten and lower the Exposure to 20 %. You should use the closest possible place for the sample to get the best result, a smaller size and a smaller hardness.
Step 3: Eyes Editing
Magnification (Hollywood effect)
We are going to slightly enlarge the eyes because this is the most important part of the face. Select a rectangle around the eyes (using the Rectangle Selection tool), copy it o a new layer and enlarge it to 102 - 105 % using the Transform tool.
Use the Rubber tool with a bigger size and lower hardness and try to delete the borders of the newly transformed rectangle so it fit into the rest of the face.
Finally, select everything (Ctrl+A) and copy merged (Ctrl+Shift+C) to merge both layers to one and do not forget to rename it.
Removing mascara
To remove the mascara use the Clone Stamp Tool, set the Mode to Lighten and lower the Opacity value to 25 %. You can also lower the size. Then try to remove the mascara slowly and gradually from both eyes.
You can also use the Clone Stamp Tool to remove the reflection in the corners but you should use the Normal mode.

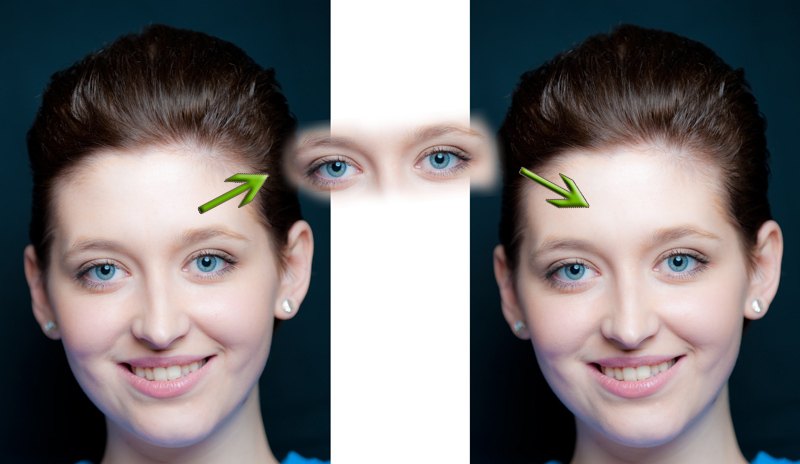
Pupil and white adjustment
Every eye is gradually losing its reflection in pupils during the life. Such an eye is then dull and featureless. The white part of the eye has the same problem - its white color is slightly changing to light grey.
Select the dark inner part of the eye (the pupil) using the Magic Wand tool and use the Burn tool (set the Range to Shadows to darken the pupil only, use Exposure around 20 %). You should set the brush size to match the size of the pupil and rather use a high hardness. Click repeatedly until the eye looks like we wanted (there should be a visible growth of the contrast).
Then switch to the Brush tool, set a normal size and
a maximal hardness and use a darker grey color. Draw a circle around the
whole iris (to a new layer). The color should not interfere with the
white part! Set the blending mode to Soft Light and
reduce the Opacity to 25 %.
This new layer will highlight the iris nicely, restore the vitality of
color and increase the contrast between iris and the white part of the
eye.
Using the Magic Wand tool select the white of the eye, duplicate it to a new layer and use the Levels tool (Ctrl+L) to brighten the new layer. Do not brighten the layer too much! After that you can make the borders smoother using the Rubber tool with a low hardness value.
Any of these steps can be repeated if we are not fully satisfied with the result.
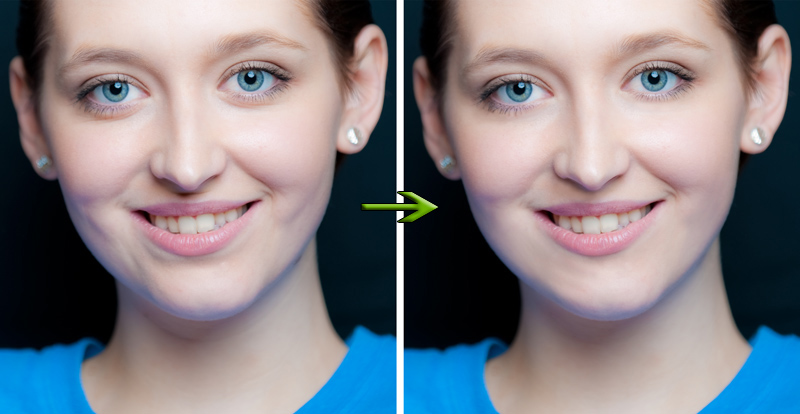
Step 4: Removal of Wrinkles and Imperfections
In the next step we are going to remove wrinkles and imperfections. The best tool for this step is the Clone Stamp Tool where two sets of settings can be combined- Lighten mode, softer brush and lower Opacity, or Normal mode, medium hardness of brush and a lower Opacity.
The first set does not damage colors in the face so much but cannot be used for everything so you have to experiment. It is a good idea to duplicate your layers often to be able to return to a previous state if something goes wrong.
Begin removing wrinkles below the eyes. You should pay attention to the eyelashes so use a smaller brush and set a lower opacity. The ideal sample color for the Clone Stamp is located around the wrinkles. The result should look like the following image:

The next places which could be retouched are under the nose, on the neck and under the mouth. All these changes are very significant so be careful and make them properly. The final version after this step should look like the following image:
The second part of the lesson is prepared here.